Connecting with multiple iPhone or iPad devices
Each remote control app — including Shutter+ — needs to be registered as a new smartphone device on your Canon camera. If you already use Shutter+ on your iPhone and want to add your iPad (or vice versa), you’ll need to go through the connection setup again for the second device. If you try to connect with the camera using a configuration of another app, the camera will reject the connection.
The exact steps depend on your camera model. Open your camera’s Menu and find the tab with network (wireless) options:
 Network under a zig-zag icon — e.g. EOS R6 Mark II, PowerShot V1
 Network under a wireless antenna icon — e.g. EOS R6, EOS 850D
 Network under a wrench/spanner icon — e.g. EOS Rebel T7, EOS 6D
Cameras with a zig-zag icon for network functions
e.g. Canon EOS R6 Mark II, PowerShot V1
We recommend using Bluetooth on your most-used device (e.g. your iPhone) for the most seamless experience — the camera will automatically establish a Wi-Fi connection when you open Shutter+. Your second device (e.g. iPad) connects via Wi-Fi only.
On these cameras, Bluetooth and Wi-Fi connections are added separately.
Setting up your main remote (Bluetooth + Wi-Fi)
Follow these steps on your most used iOS device (e.g. iPhone). Only one device can be paired via Bluetooth.
- On the camera, go to Menu → Network function tab → Connect to smartphone(tablet).
- Select Add a device to connect to.
- The camera may prompt you to enable Bluetooth — select OK.
- Press SET to begin pairing.
- Open Shutter+ app and follow the Add camera → Wireless (Wi-Fi + Bluetooth) guide. The camera name will appear — tap it to pair.
- Confirm the Bluetooth pairing dialog on your iPhone.
- Press SET on the camera to complete pairing.
When you use Shutter+, the camera will automatically set up a Wi-Fi connection on top of Bluetooth.
Reconnecting your main remote (Bluetooth + Wi-Fi)
With Bluetooth, reconnection is automatic. Simply turn on the camera, open Shutter+ app on your device and select Remote Control or Photo Import to connect.
Setting up your secondary remote (Wi-Fi only)
Follow these steps on all of your additional iOS devices (e.g. iPad or family member’s iPhone).
The camera can only be Bluetooth-paired with one device at a time, so the second device connects via Wi-Fi.
- On the camera, go to Menu → Network function tab → Advanced connection → Connect to smartphone(tablet).
- Select Add a device to connect to.
- Press SET to skip the QR code.
- Select Camera access point mode.
- The camera will display an SSID and password.
- Open Shutter+ app and follow the Add camera → Wireless (Wi-Fi only) guide.
- Scan the SSID and password displayed on the camera with Shutter+ and confirm Wi-Fi connection.
Reconnecting your secondary remote (Wi-Fi only)
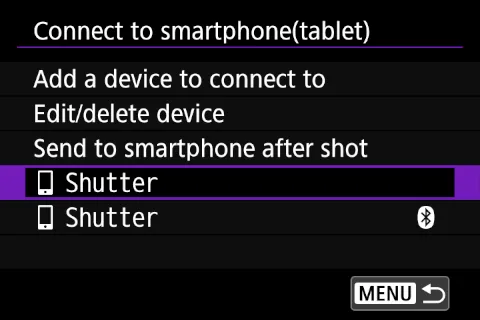
- On the camera, go to Menu → Network function tab → Connect to smartphone(tablet).
- Select [Shutter+] option without the Bluetooth logo next to it. The camera will start a Wi-Fi connection.
- Open Shutter+ app on your device and select Remote Control or Photo Import to connect.
Tips
- Only one device at a time. Only one iPhone or iPad can control the camera at any given time.
- Use Bluetooth on your main device. If your camera supports Bluetooth, pair it with the device you use most often. Bluetooth enables automatic reconnection — you just open Shutter+ and it connects.
- Wi-Fi connections work on all devices. The “Connect via Wi-Fi” path works on both iPhone and iPad and doesn’t require Bluetooth.