How to Shoot a Stitched Panoramic Photo Using Shutter+
By Ian Middleton · Travel & landscape photographer
Master the Art of Panoramic Photography With Shutter+
We are always happy when users share their experience with Shutter+. Ian Middleton created a great YouTube tutorial on how to create a stitched panoramic photo, showing how he used Shutter+ with his Canon EOS R5 to make everything so much easier, completely avoid the risk of camera shake, get a much clearer view of the composition on the app’s display and see the overlap more clearly when framing each successive shot.
Watch his video to see the full process, or read the detailed article below.
Explore Shutter+ features for Canon EOS R5.
What Is a Stitched Panoramic Photo?
A stitched panoramic photograph is created by taking a sequence of overlapping frames by rotating the camera incrementally between each shot and then blending them together in post-processing software to create a single, ultra-wide, high-resolution image. Unlike the in-camera panoramic sweep mode found on most cameras and smartphones, a properly stitched pano preserves full image quality and gives you precise control over every frame.
Whether you’re capturing sweeping mountain landscapes, dramatic coastlines, or urban skylines, stitched panoramics deliver a level of detail and resolution that a single frame simply cannot match.
What Equipment Do You Need to Shoot a Stitched Panoramic?
Camera & Lens
Any mirrorless or DSLR camera with manual exposure controls will work well. The setup used in this tutorial is:
- Canon EOS R5 mirrorless camera
- Canon EF 24–105mm f/4L IS USM lens
A versatile standard zoom like the 24–105mm is an excellent choice for panoramics — it gives you the flexibility to frame your starting composition, then commit to a focal length for the sequence. Longer telephoto lenses can also work well and produce a compressed, dramatic look, but any lens from 24mm and above can be used effectively depending on your subject.
Tripod
A sturdy, well-levelled tripod is non-negotiable for stitched panoramics. Any movement between frames — tilt, twist, or vibration — will cause alignment issues that are difficult or impossible to fix in post. For this tutorial, a Benro 34CLV tripod with a geared head was used. A geared head is particularly valuable because it allows ultra-precise, micro-adjustment movements, which is critical when rotating between frames.
Key tripod requirements for panoramic photography:
- Solid build with minimal flex under the weight of your lens
- A pan head or geared head that allows smooth, controlled horizontal rotation
- Ideally a dedicated panoramic nodal rail to reduce parallax error (more important with wider lenses)
Remote Shutter: Why Shutter+ is the Best Option
This is where most photographers make a costly mistake. Many photographers use a basic wired or Bluetooth remote shutter release; and while that avoids pressing the camera button directly, it still leaves you hovering near the camera, squinting at a small rear screen to check your composition and settings.
Shutter+ transforms your iPhone or iPad into a full remote camera control. It connects wirelessly to your camera via Wi-Fi and gives you a live view of your scene on a large, bright screen; making it far easier to compose, check focus, and trigger each frame with absolute precision.
Supported cameras include: Canon, Sony & Fujifilm. See shutter.dev/cameras for the full compatibility list.
Why Use Shutter+ Instead of an Ordinary Remote Trigger?
A basic remote shutter release does one thing: fires the shutter. Shutter+ does far more:
| Feature | Basic Remote | Shutter+ |
| Remote shutter trigger | ✅ | ✅ |
| Live view on your iPhone or iPad | ❌ | ✅ |
| Adjust exposure settings remotely | ❌ | ✅ |
| Set focus remotely | ❌ | ✅ |
| Grid overlays for composition | ❌ | ✅ |
| Large screen for frame visualisation | ❌ | ✅ |
| Check each frame without touching camera | ❌ | ✅ |
When shooting a panoramic sequence, you’re rotating the camera between 5, 7, 10 or more frames. You do need to go to the camera to rotate it between each shot — but that should be the only reason you’re touching it. With a standard remote, you’re also having to check the screen, verify exposure and focus, and maybe even fiddle with settings every time. With Shutter+, all of that is handled from your phone. You rotate the camera, step back, and everything else — live view, settings, triggering — is done without any further contact. That minimal-touch approach is what keeps the camera stable and your sequence consistent.
Step-by-Step Guide: How to Shoot a Stitched Panoramic with Shutter+
Step 1: Set Up and Level Your Tripod
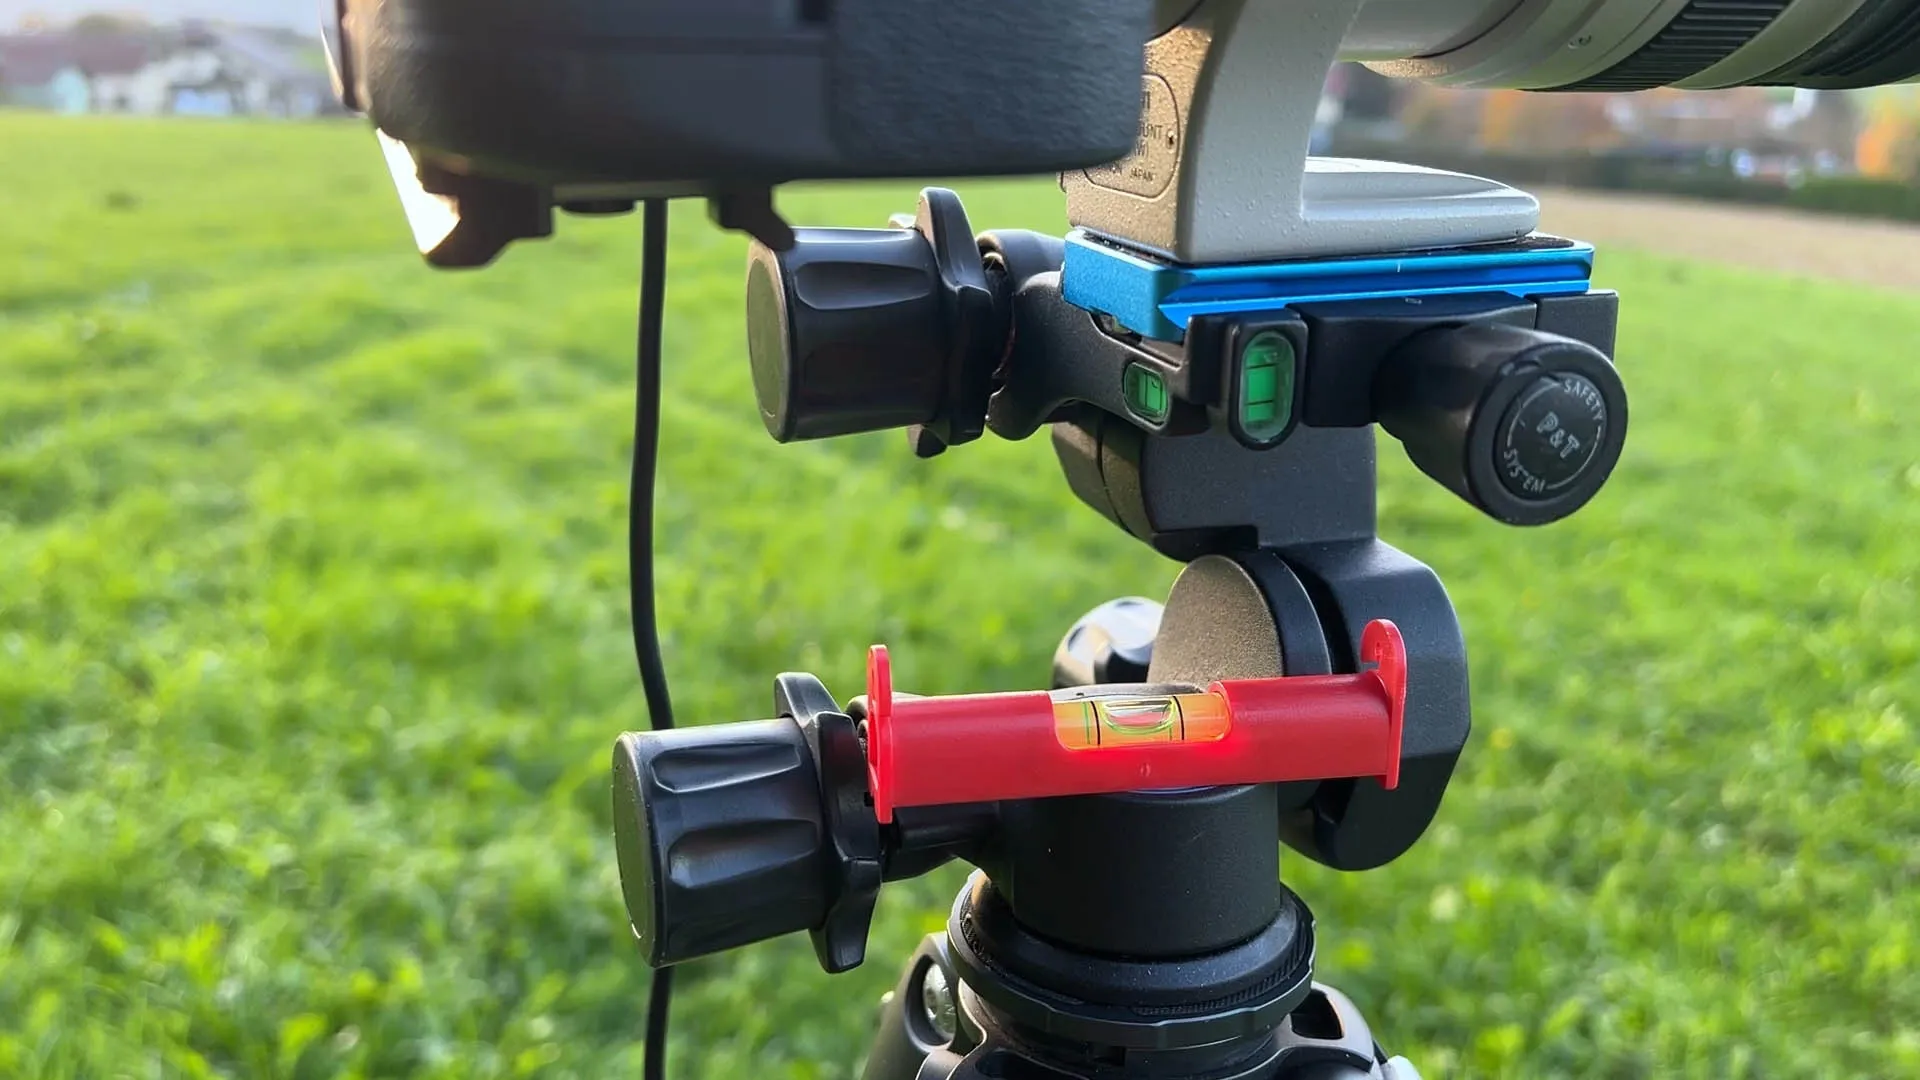
Before you think about composition or camera settings, get your tripod perfectly level. On uneven terrain — a hillside, a beach, rough ground — this takes patience but is absolutely essential.
- Extend the legs to compensate for any slope, adjusting each leg independently
- Use a spirit level to check you’re perfectly flat — a small, flat bubble level from a hardware store placed directly on a flat surface of the tripod head or camera base works extremely well. It’s much easier to read at eye level than a top-mounted level on a tall tripod, which often requires standing on tiptoe to see clearly
- Check the level in two axes — front-to-back and side-to-side
- Once level, tighten all leg locks firmly
- If using a geared head, use the fine-adjustment controls to get the pan axis perfectly horizontal
A poorly levelled tripod means your sequence of frames will arc up or down as you pan — making stitching difficult and wasting image real estate.
Step 2: Pre-Visualise the Full Panoramic Frame
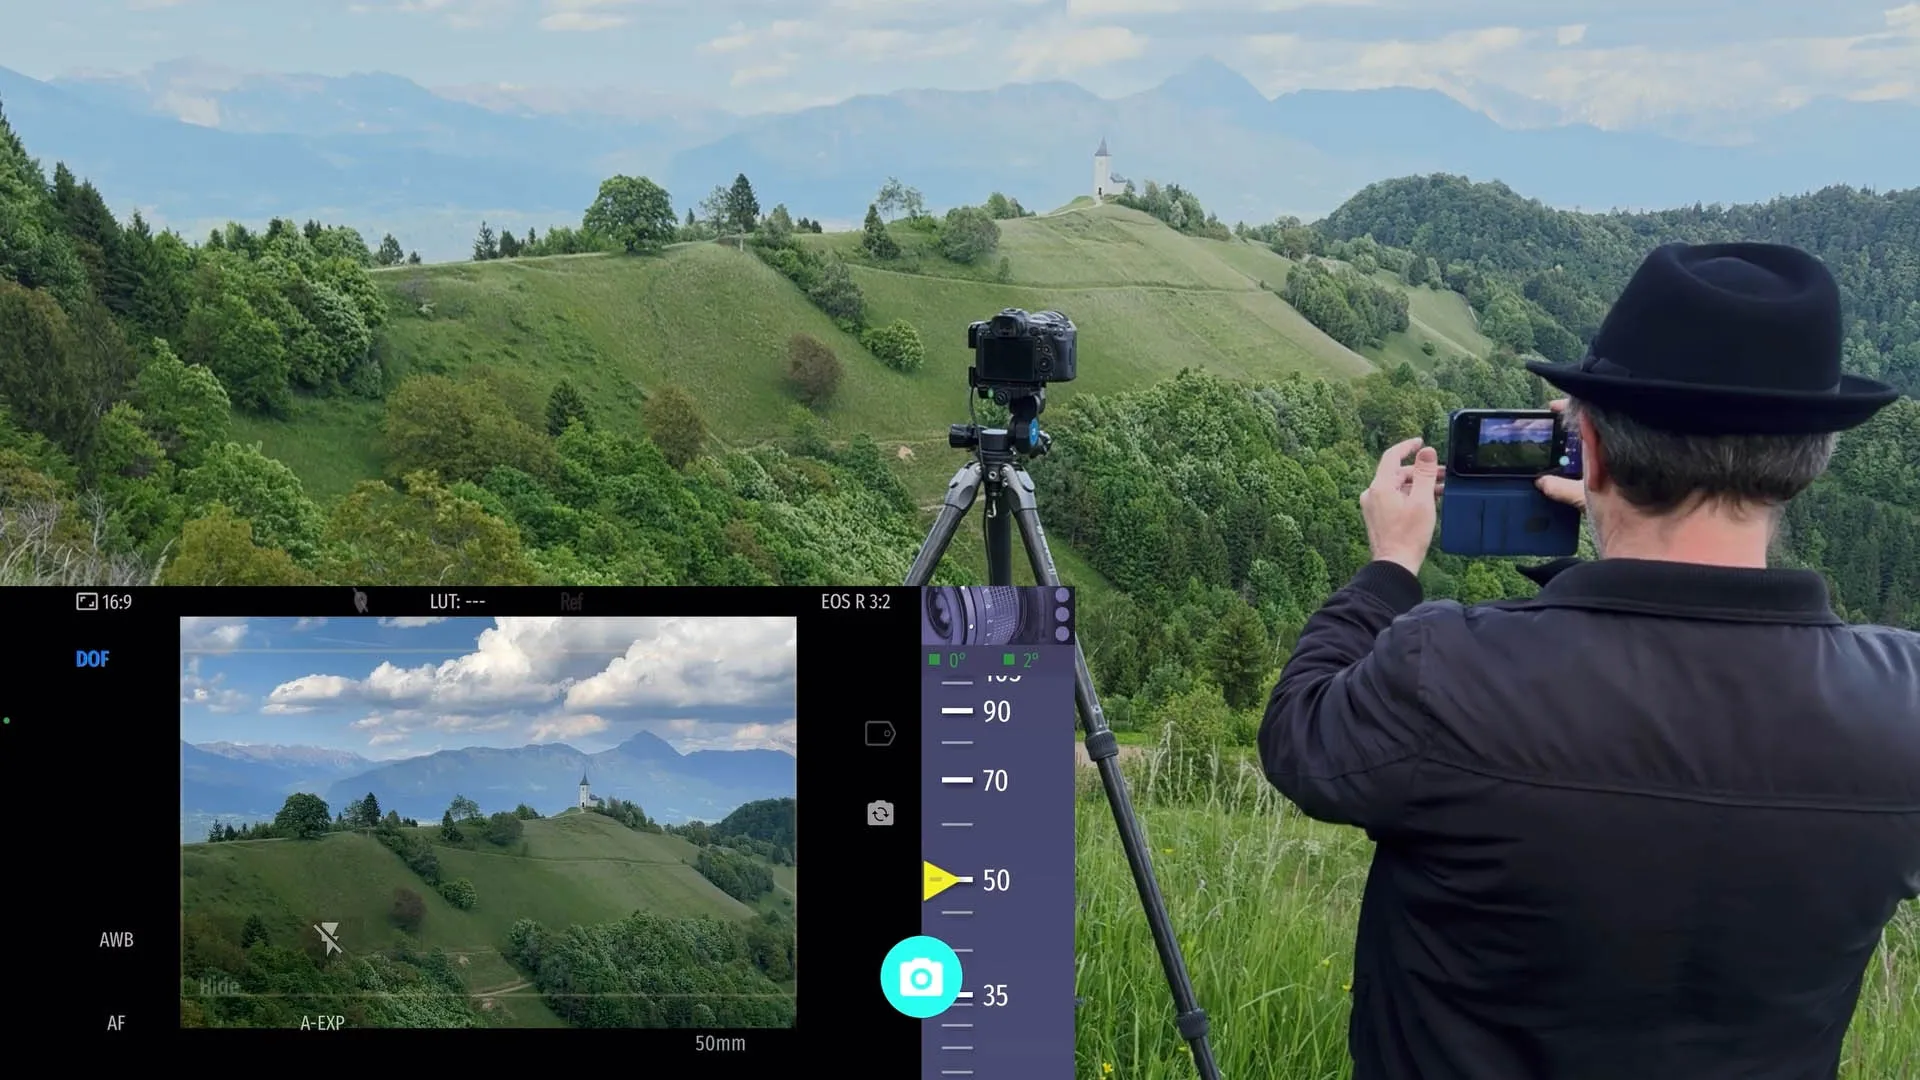
Pan slowly through the full intended sequence to visualise where your panorama will begin and end. Think about:
- What will anchor the left edge of the final image?
- What will anchor the right edge?
- Is there anything in the foreground that could cause parallax issues as you pan?
- How much sky and foreground do you want to include?
This step is dramatically easier with Shutter+ — rather than squinting at your camera’s small rear screen while crouching behind a tripod, you can stand upright, hold your phone comfortably, and sweep through the scene on a large, bright display.
Step 3: Set Your Camera to Portrait (Vertical) Orientation
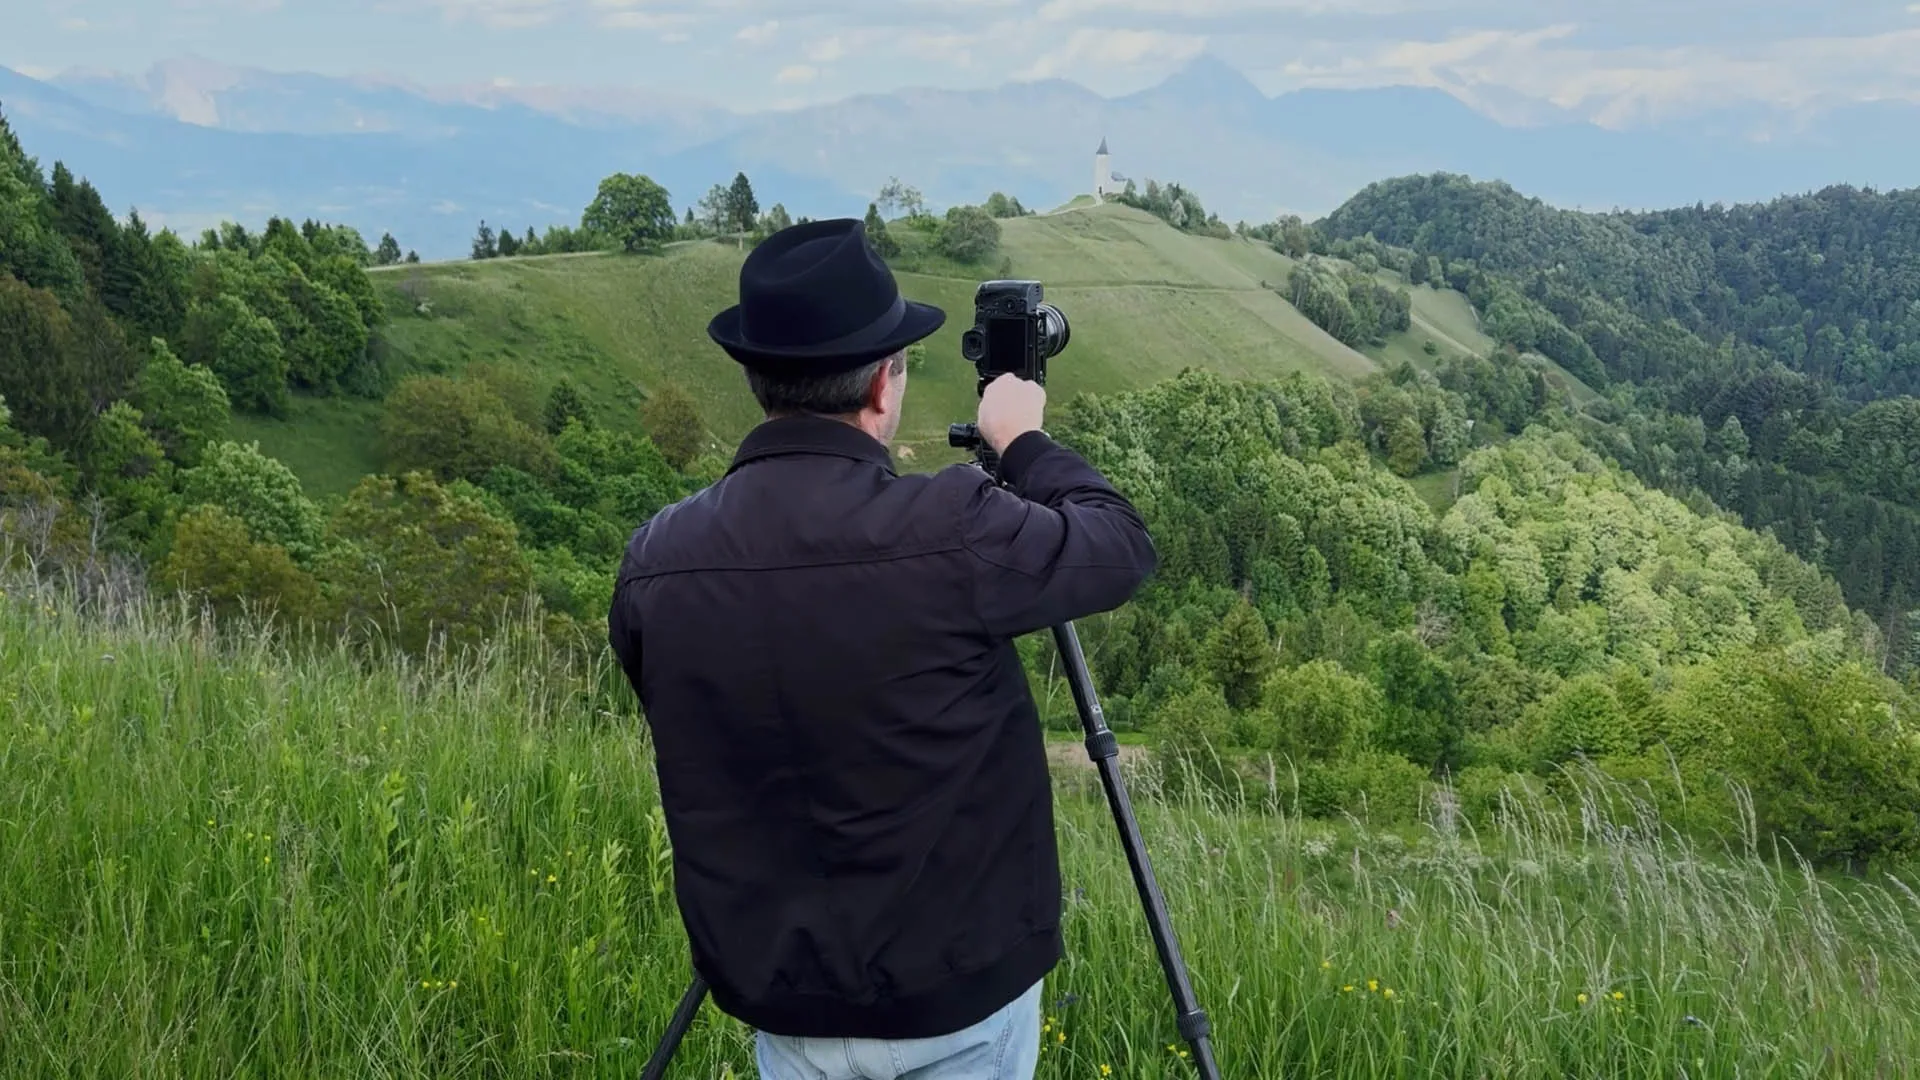
Rotate your camera 90° so it’s shooting in portrait orientation. This seems counterintuitive when shooting a wide panoramic, but it is the correct approach for two reasons:
- More vertical coverage: rotating portrait gives you significantly more height in the final stitched image, which means more room to crop and still have a tall panoramic
- More frames, more resolution: you will take more individual shots to cover the same horizontal span, resulting in a much higher final megapixel count
Make sure your tripod head allows the camera to sit in portrait orientation stably without any tilt or slop in the head.
Step 4: Connect Shutter+ and Set Your Exposure
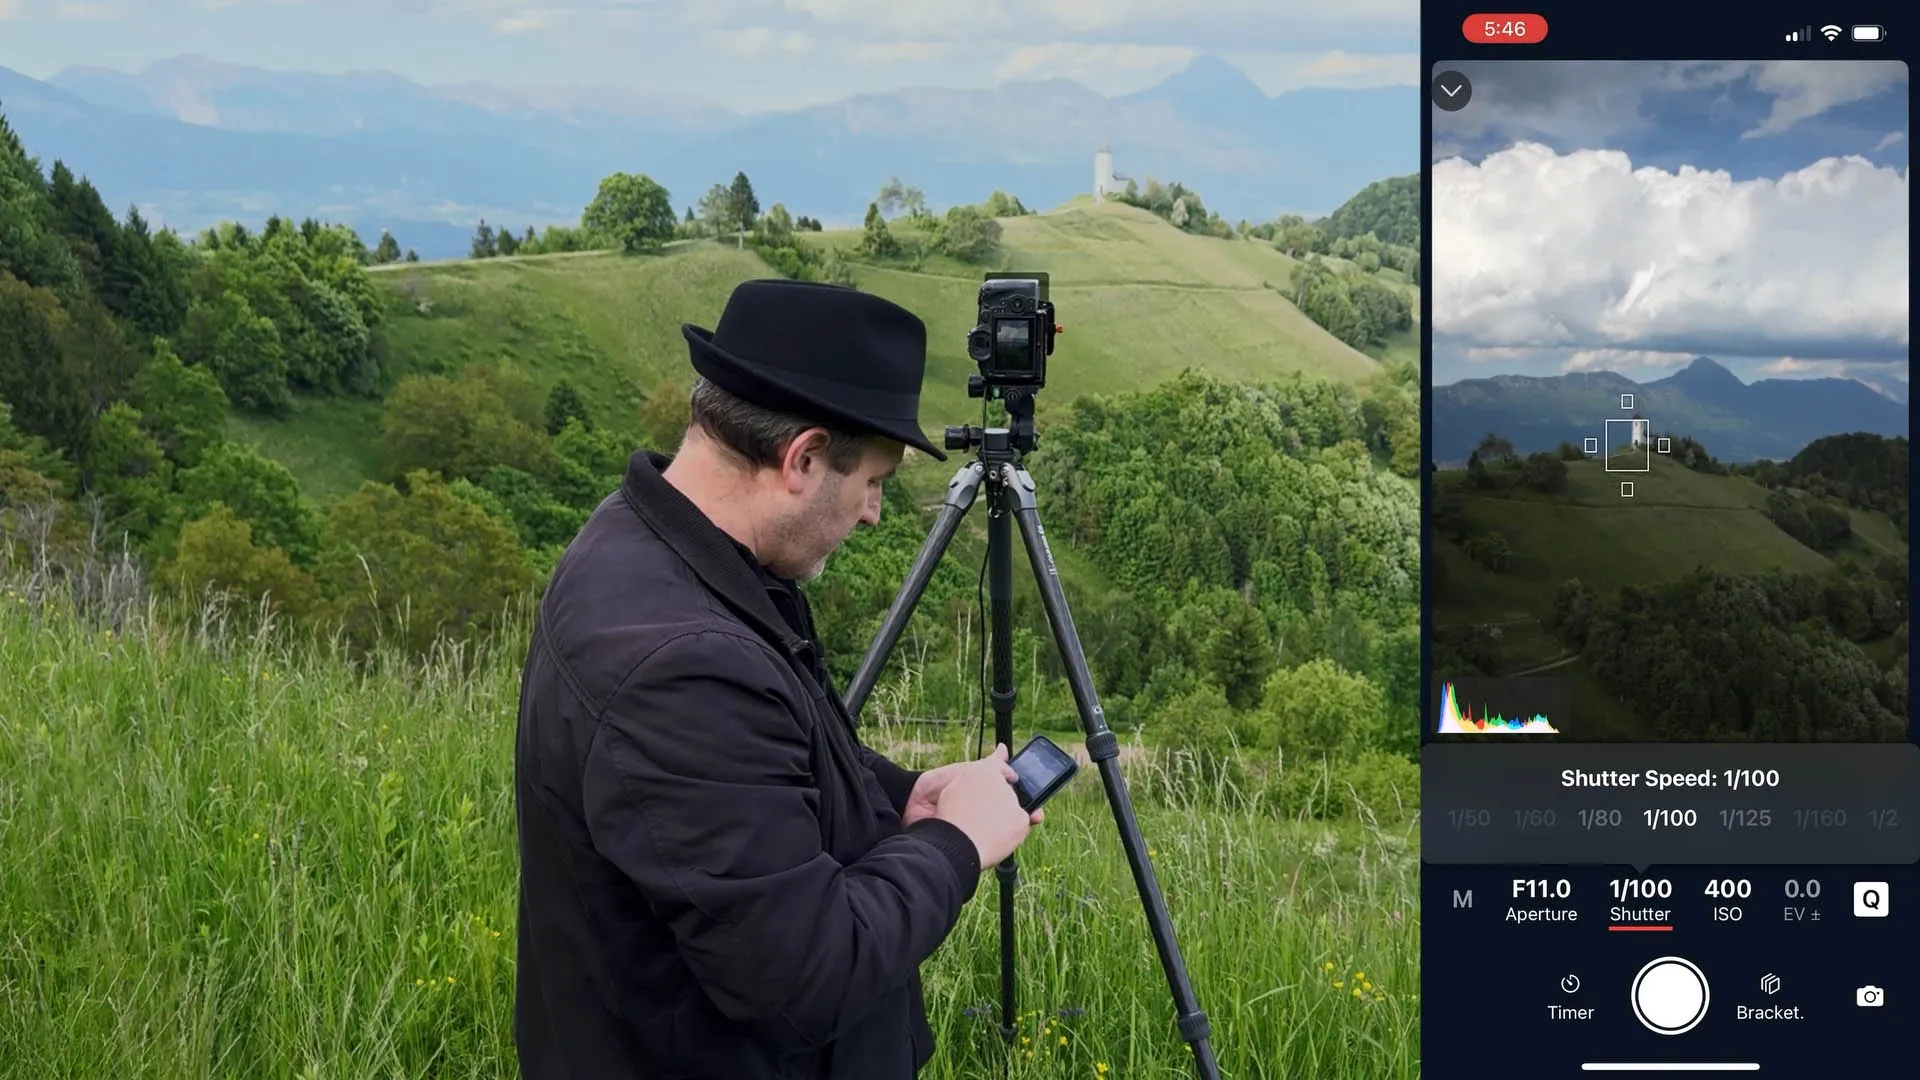
Open Shutter+ on your iPhone and connect to your camera. Once connected:
- Switch to Manual mode (M) on your camera — consistent exposure across all frames is critical. Any exposure variation between frames will create bright or dark banding in the final stitch
- Use Shutter+ to adjust your ISO, aperture, and shutter speed without touching the camera
- Use the live view histogram in Shutter+ to verify your exposure is correct
- Lock your white balance — do not leave it on Auto. If white balance shifts between frames, your frames will have different colour casts that are very difficult to match in post
- Lock your focus — autofocus between frames risks a focus shift. Set your focus on your subject, confirm it in the Shutter+ live view, then switch the lens to Manual Focus (MF) to lock it in place
Step 5: Use the Grid Overlay to Set Your Starting Frame
In Shutter+, enable the grid overlay. This gives you compositional guidelines — rule of thirds lines and frame edge markers — displayed directly on the live view on your phone screen. Use these to:
- Identify a clear reference point on the left edge of your starting frame
- Note where the horizon sits relative to the grid lines — this helps you keep it consistent as you pan
- Assess whether your framing includes enough overlap on the left and right edges
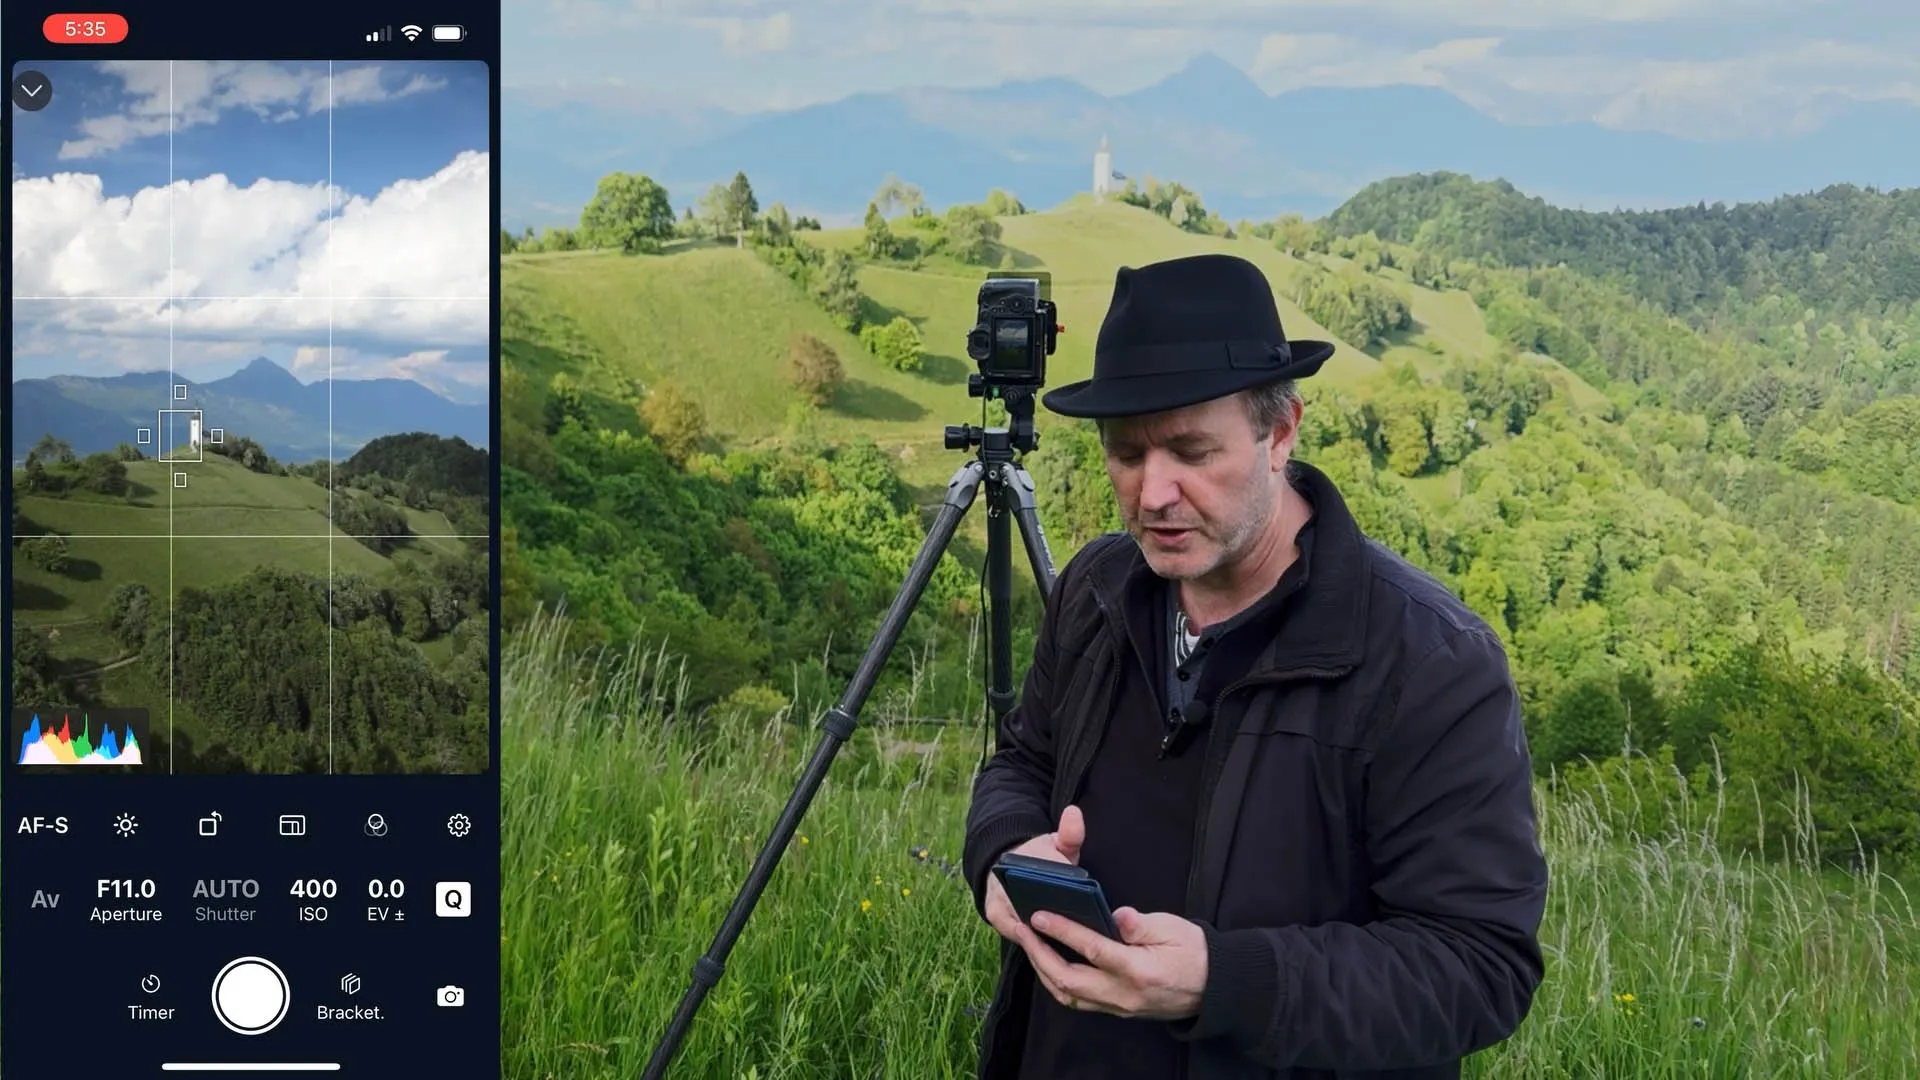
Step 6: Capture Your Sequence of Frames
Now you’re ready to shoot. The key rules for a successful sequence:
- Overlap each frame by 30–50%: this gives Photoshop plenty of shared visual information to stitch the frames together. Less than 20% overlap and stitching can fail or produce visible seams
- Pan in one direction only — left to right is the convention
- Do not rush: after each pan, wait 2–3 seconds for any vibration to settle before triggering
- Trigger each frame using Shutter+ — tap the shutter on your phone screen. Your hands never touch the camera. Zero camera shake
- Use the Shutter+ live view to check each frame as you go — verify that focus and exposure remain consistent, and that your overlap is sufficient
- Shoot a few extra frames at each end — it’s easy to clip something important at the edges, and extra coverage costs nothing
After each frame, pan the camera slightly in your chosen direction, keeping the rotation smooth and consistent. A geared head makes this much more precise.
Step 7: Review Your Sequence Before Leaving the Location
Before packing up, scroll through your frames in Shutter+ or on the camera. Check:
- Every frame is sharp
- Exposure is consistent across the full sequence
- Overlap is present on every adjacent pair
- No frames were accidentally skipped
It is far better to reshoot on location than to discover a problem at your desk.
How to Stitch a Panoramic Photo in Adobe Photoshop
Once you have your sequence of frames, Photoshop’s Photomerge feature does the heavy lifting.
Step 1: Stitch First, Edit Later (Or Develop RAWs First)
There are two valid approaches here, and the workflow used in this tutorial is to feed the RAW files directly into Photomerge without any prior development. Photoshop stitches from the original RAW data, and all editing is done on the final stitched result. This is a clean, efficient approach — and it sidesteps any risk of subtle inconsistency between individually processed frames.
If you prefer to develop your RAWs before stitching, that is equally valid:
- Open all frames together in Lightroom or Camera Raw
- Apply identical corrections to every frame — exposure, white balance, lens correction, noise reduction
- Sync your settings across all frames before proceeding
- Export as 16-bit TIFFs for maximum editing latitude, then bring those into Photomerge
Step 2: Open Photomerge in Photoshop
- Go to File → Automate → Photomerge
- Click Browse and select all the frames in your panoramic sequence
- Choose Auto as the layout option — Photoshop will analyse the overlapping content and select the best projection method automatically
- Enable Blend Images Together and Geometric Distortion Correction
- Click OK — Photoshop will now align and blend the frames. Depending on resolution and the number of frames, this may take several minutes
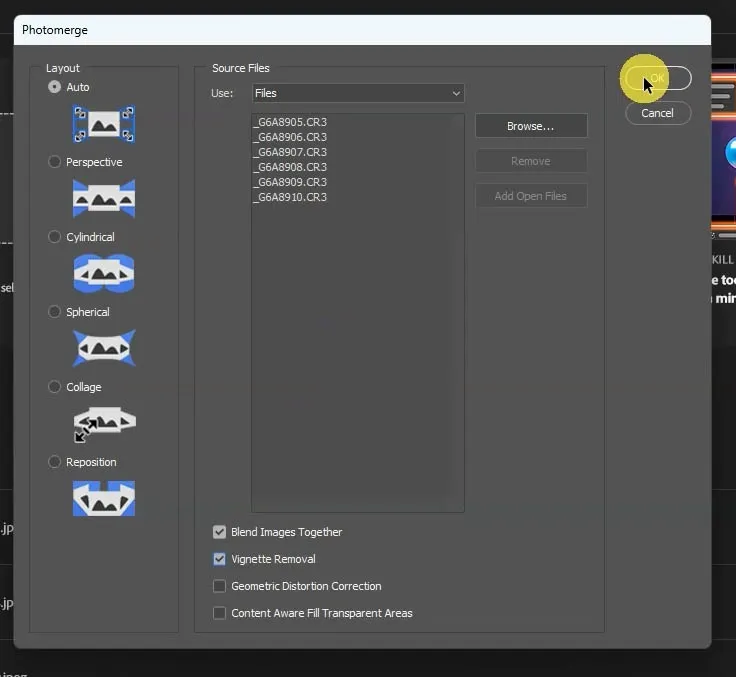
Step 3: Flatten, Crop, and Finalise
Once Photomerge completes, you will have a layered file with each frame on its own layer, masked together with gradient blends:
- Go to Layer → Flatten Image
- Use the Crop tool to trim the ragged, uneven edges that are inevitable in a stitched panoramic — this is why you shot with enough vertical coverage in portrait orientation
- Make any final colour grading, sharpening, or tonal adjustments
- Save as a PSD to preserve your full resolution working file, then export a JPEG or TIFF for sharing or printing
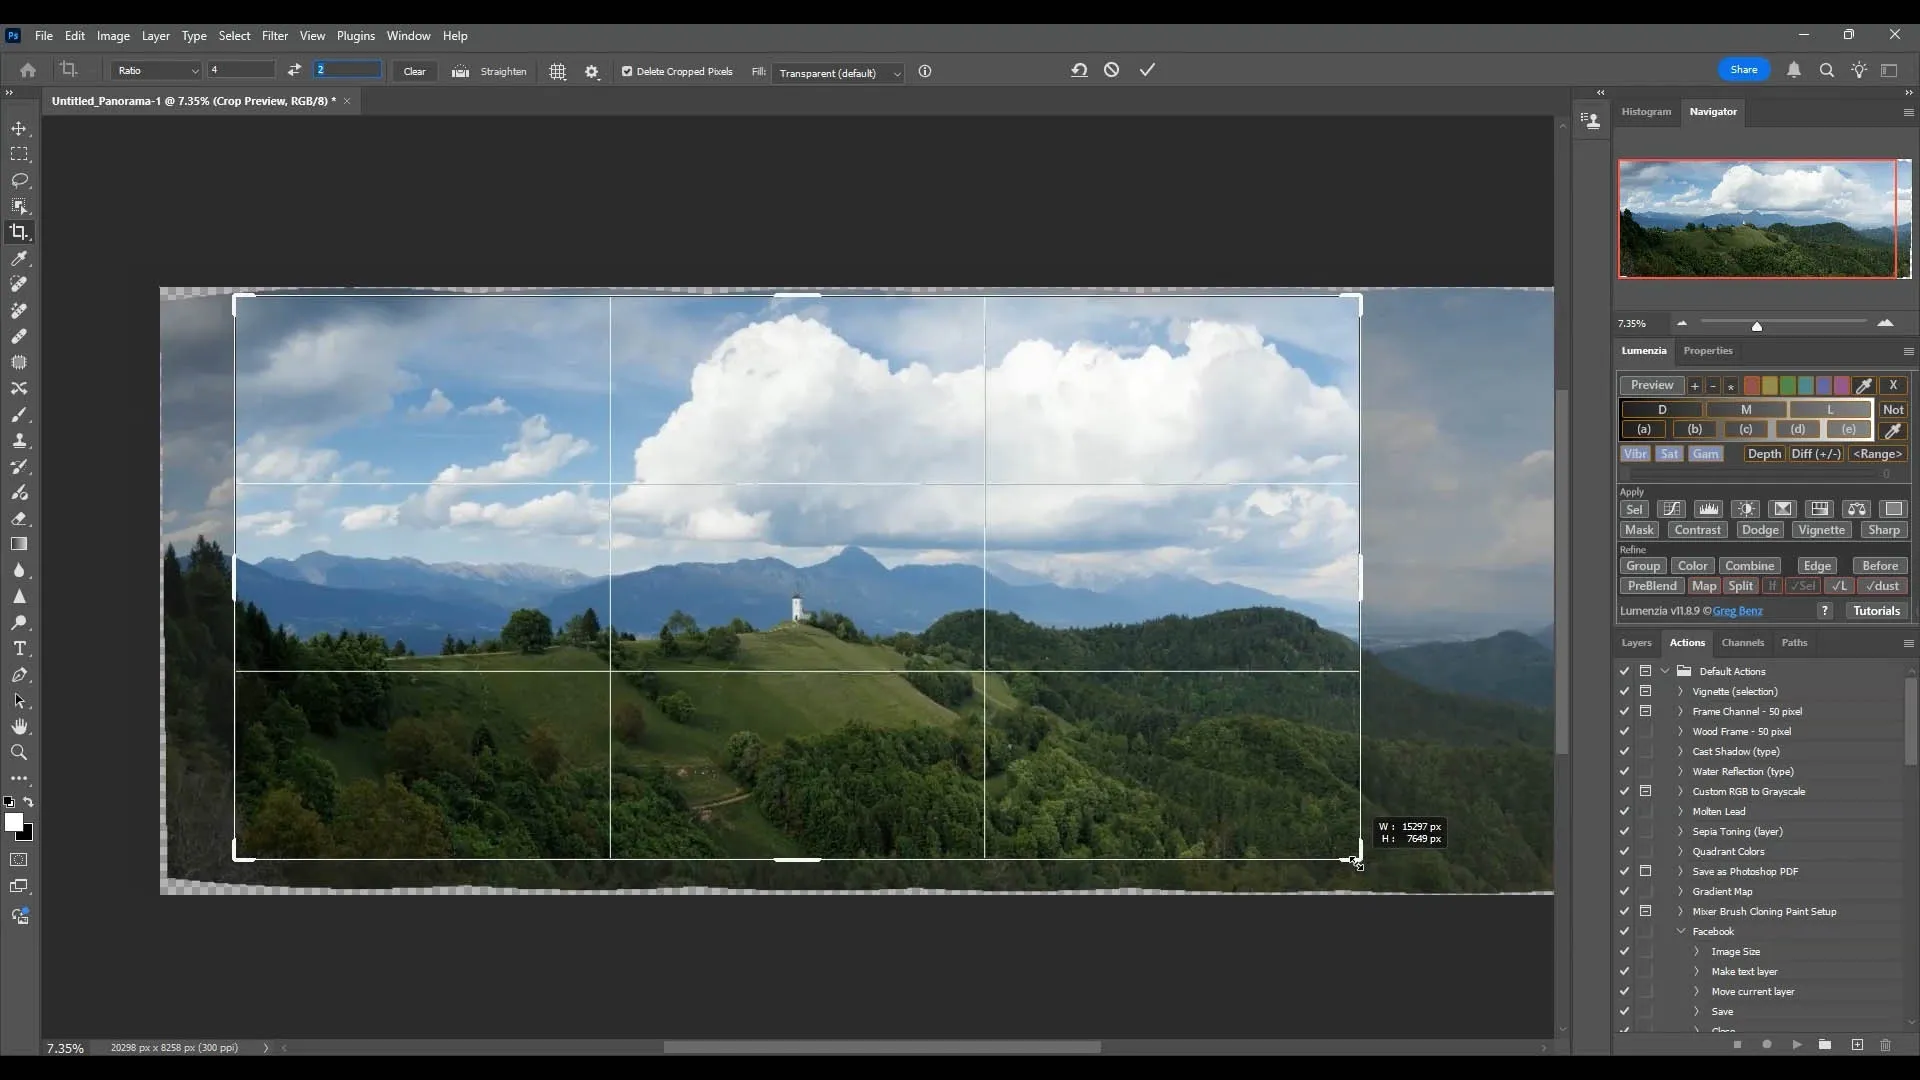
Tips for a Cleaner Stitch
- Avoid moving subjects in the scene where possible — people, waves, or trees blowing in wind can cause ghosting artefacts at stitch boundaries
- If you have a problematic seam, use the Clone Stamp or Content-Aware Fill to repair it after flattening
- For very wide sequences (10+ frames), Cylindrical projection in Photomerge can produce better results than Auto
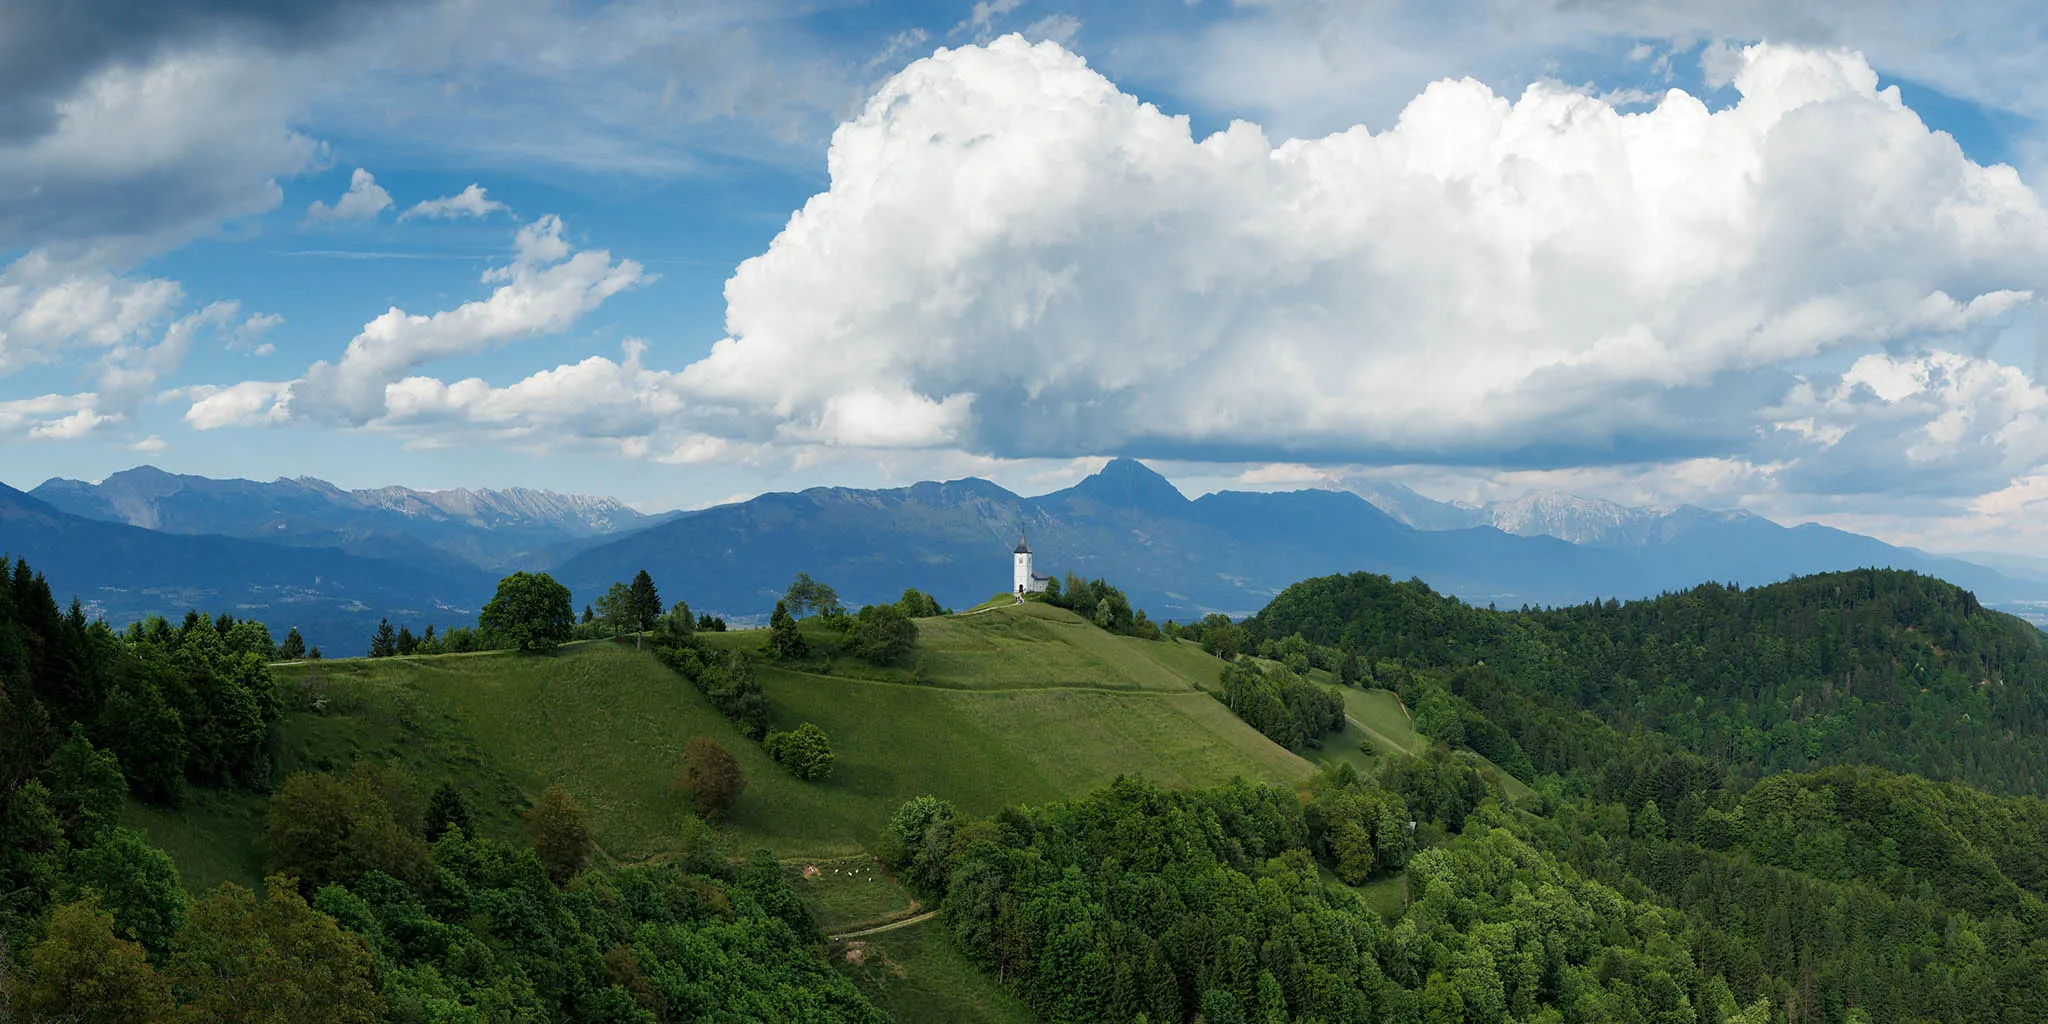
Summary: Why Shutter+ Makes Stitched Panoramics Better
Shooting a stitched panoramic is a technical process. Every variable — exposure, focus, overlap, shake — has to be controlled consistently across every single frame. Shutter+ addresses the biggest practical challenges:
- No camera shake: triggering from your phone means zero physical contact with the camera or tripod during capture
- Better visualisation: the large iPhone screen gives you a far clearer view of each frame’s composition than the camera’s rear LCD — especially useful outdoors in bright light
- Remote control of settings: adjust ISO, shutter speed, and aperture from your phone if conditions change mid-sequence, without disturbing the camera’s position
- Grid overlays: compositional guides on the live view help you maintain consistent framing and horizon placement across the sequence
- Confidence in every frame: checking each shot on a large screen as you go means you leave the location knowing your sequence is solid
Frequently Asked Questions
What is the best camera for panoramic photography?
Any camera with full manual controls and RAW shooting capability will work well. Full-frame mirrorless cameras such as the Canon EOS R5, Sony A7R V, or Nikon Z8 offer the highest resolution for large-format panoramic prints.
What lens should I use for a stitched panoramic?
Wide-angle to short telephoto lenses (24mm–200mm) are most commonly used. Longer telephoto lenses produce a compressed, dramatic look and are excellent for distant landscapes. Wider lenses require more careful attention to parallax error.
Do I need a special panoramic tripod head?
A geared head or fluid pan head is strongly recommended. For wide-angle lenses, a dedicated nodal rail helps eliminate parallax error. For telephoto panoramics, a standard geared head is sufficient.
How much overlap should I use between panoramic frames?
30–50% overlap between adjacent frames is the standard recommendation. More overlap gives the stitching software more to work with and produces cleaner seams.
Why is my panoramic blurry or misaligned?
The most common causes are camera shake during capture (solved by remote triggering with Shutter+), a poorly levelled tripod, inconsistent focus between frames, or insufficient overlap. Using Shutter+’s live view and grid overlay helps prevent all of these.
What is the best app for remote camera control for panoramic photography?
Shutter+ is one of the most capable options available for Canon, Sony, and Fujifilm cameras. It provides live view on your iPhone, full remote control of exposure settings, and grid overlays — all of which are directly useful for panoramic capture.
Can I stitch panoramics without Photoshop?
Yes — PTGui, Hugin (free), and Lightroom’s Panorama Merge feature are all capable alternatives. However, Photoshop’s Photomerge remains one of the most accessible and reliable options for most photographers.
Equipment used in this tutorial: Canon EOS R5 · Canon EF 24–105mm f/4L IS USM · Benro 34CLV tripod with geared head · Shutter+ on iPhone 15 Pro Max · Adobe Photoshop CC