What Is Focus Peaking?
By Ian Middleton · Travel & landscape photographer
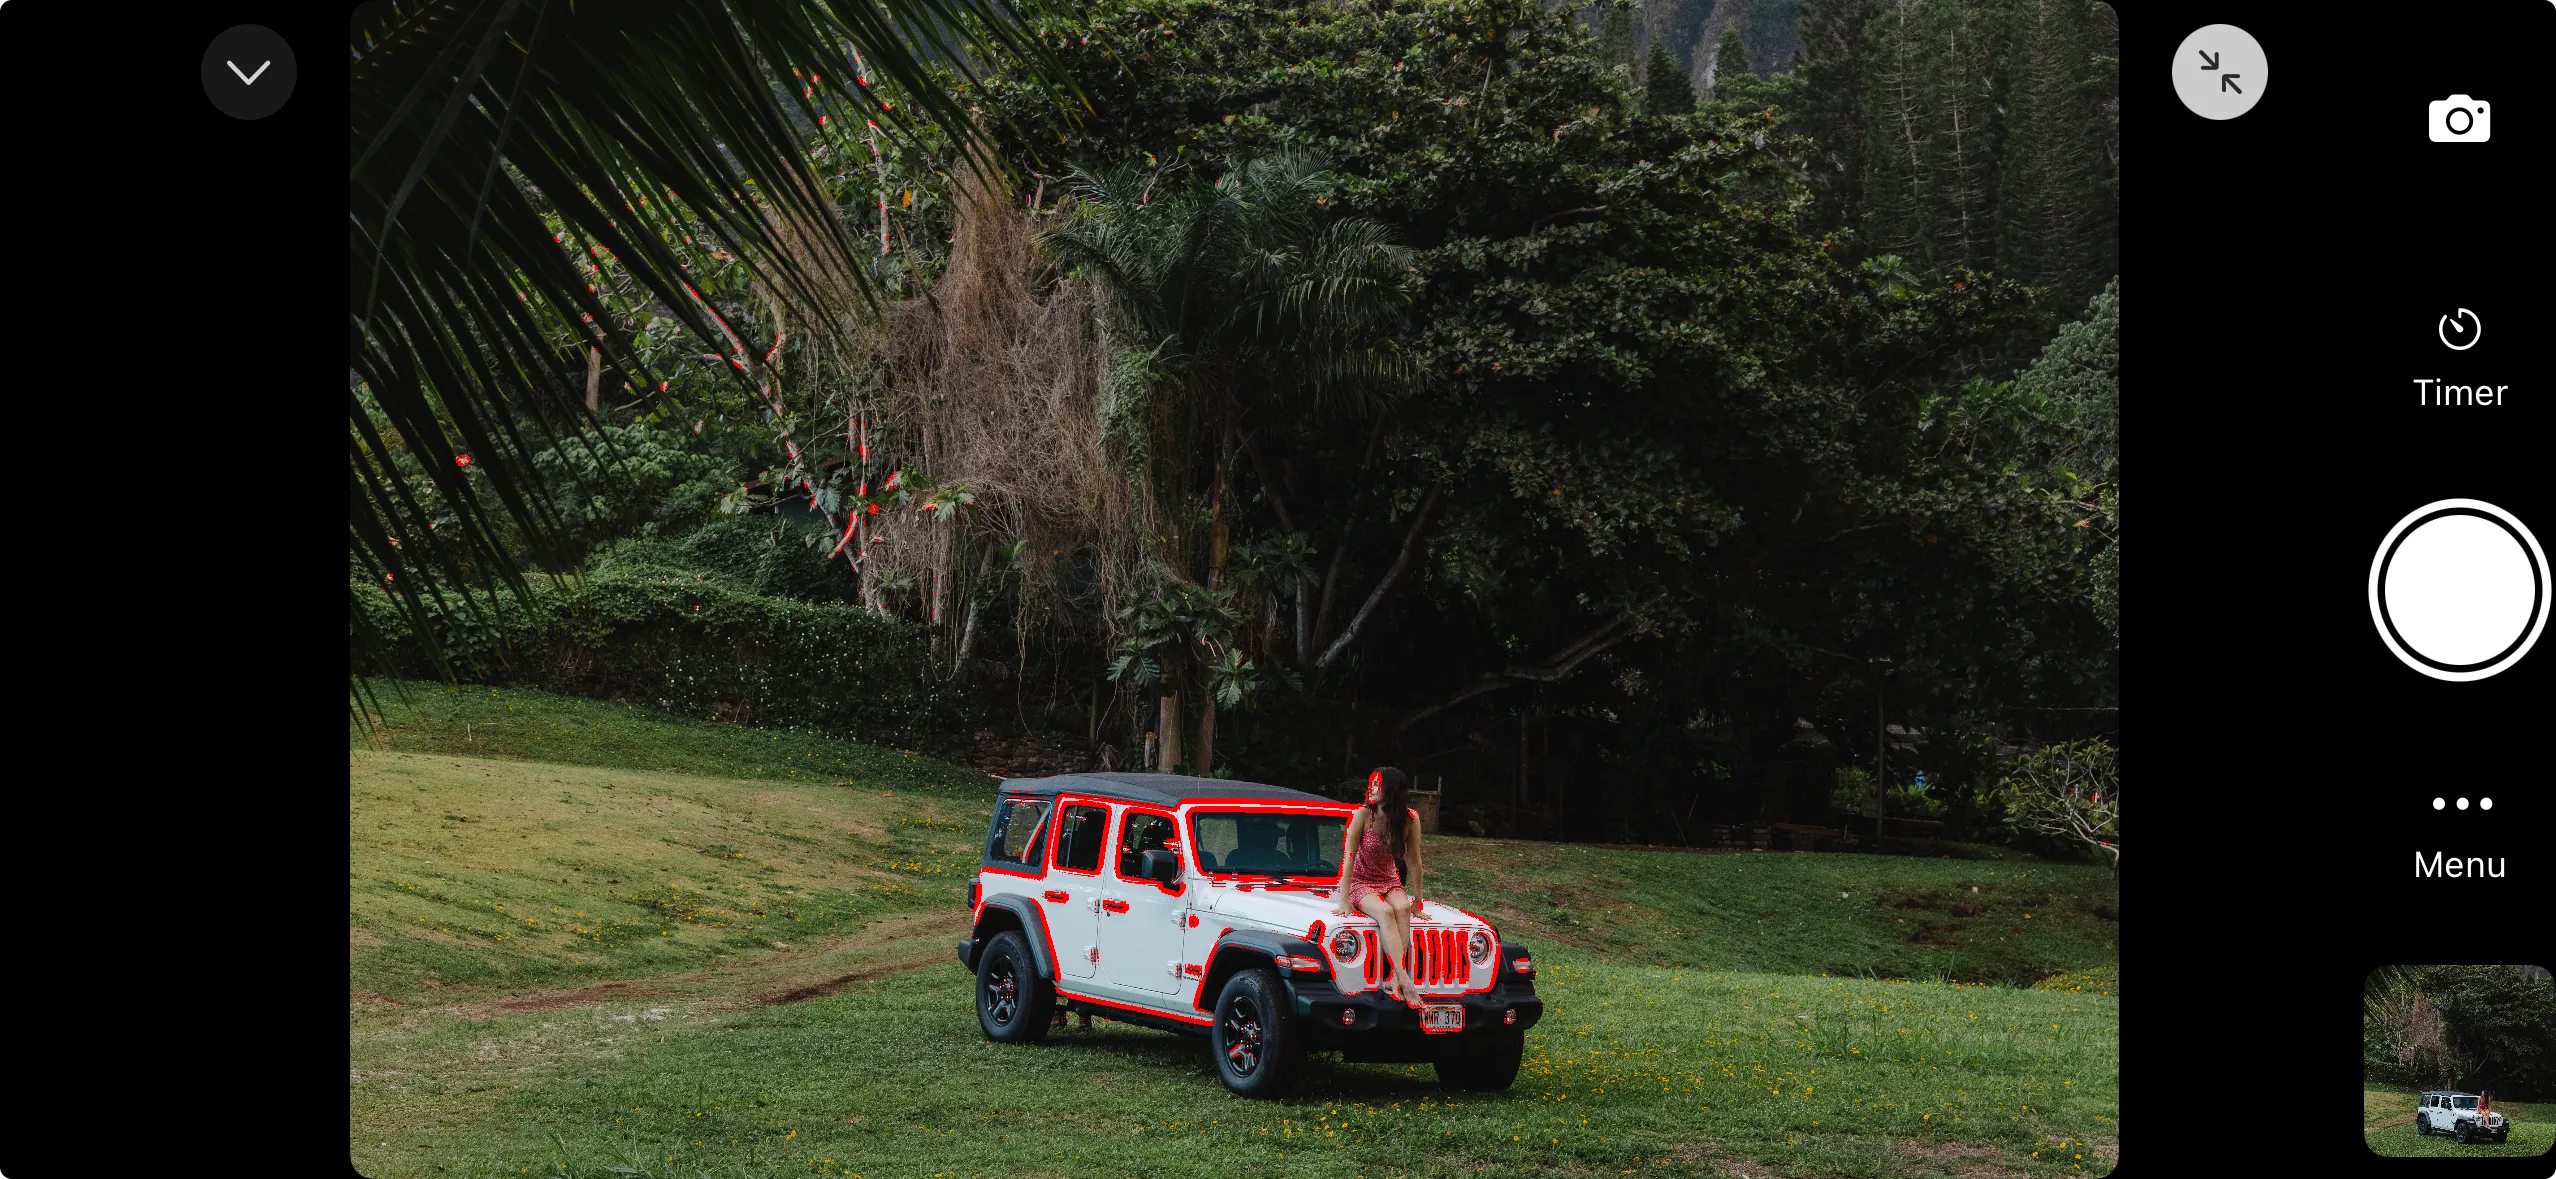
Focus peaking is a live view display that outlines the parts of your image currently in sharp focus with a colored overlay, usually red, green, or white. As you turn the focus ring or move the focus point, the highlighted edges shift in real time, so you can see exactly what’s sharp before you press the shutter, instead of guessing from a small screen or waiting until you’ve already taken the shot.
It’s one of the most useful tools for manual focusing, and it’s also a fast way to double-check that autofocus locked onto the right thing. Here’s how it works, when it’s worth using, and what to do if your camera never got the feature in the first place.
How Focus Peaking Actually Works
Focus peaking analyzes the live view feed for edge contrast. Wherever the contrast between light and dark is sharpest, the software assumes that area is in focus and draws a colored outline over it. Move the focus ring, and the outlines follow whatever part of the scene has the highest contrast at that moment.
It’s a contrast-detection trick, not a measurement of actual distance, which is why it works differently from autofocus. Autofocus tries to lock onto and track a subject. Focus peaking just tells you, visually, which edges are currently sharp, and leaves the decision about what matters in the frame up to you.
Why Photographers Use It
A few situations where focus peaking earns its keep:
-
Manual focus lenses. Vintage glass, cine lenses, and macro lenses with no autofocus motor all rely on you turning the ring accurately. Peaking makes that fast instead of frustrating.
-
Macro photography. Depth of field can be a few millimetres at close range. Peaking shows you precisely which sliver of the subject is sharp.
-
Video. You can’t half-press a shutter button mid-recording to check focus. A peaking overlay lets you pull focus confidently while rolling.
-
Low light and low contrast scenes. Autofocus hunts when there isn’t much contrast to grab onto. Manual focus with peaking often gets there faster.
-
Confirming autofocus. Even in AF mode, a quick glance at the peaking overlay tells you whether the camera focused on the eye or the eyebrow.
Focus Peaking vs. Zooming In to Check Focus
Digitally zooming into the live view to check sharpness is more precise for a single static point, since you’re looking at actual pixels rather than an edge-detection estimate. But it only shows you one area at a time, and it doesn’t work at all for video or for tracking focus as you turn the ring. Focus peaking trades a bit of precision for speed and full-frame coverage — you see everything that’s sharp at once, continuously, which is what makes it so useful in the moment. Many photographers use both: peaking to get close, then a quick zoom-in to confirm on a critical shot.
What If Your Camera Doesn’t Have Focus Peaking?
Focus peaking isn’t universal. It’s most common on higher-end mirrorless cameras, and even then it depends on the manufacturer having built it into the firmware. A lot of DSLRs, entry-level mirrorless bodies, and older camera generations never got it at all, which leaves you focusing manually on a small screen with no visual aid whatsoever.
This is where Shutter+ changes the equation. Focus peaking in Shutter+ is processed on your iPhone or iPad itself, using the live view feed streamed from the camera — not by the camera’s own processor. That means it doesn’t depend on whether your specific camera model shipped with peaking built in. As long as your camera is on Shutter+‘s supported cameras list and can send a live view feed, Shutter+ can overlay focus peaking on top of it, even on a body that has no peaking option anywhere in its own menus.
It’s worth being clear about what this is and isn’t: Shutter+ isn’t unlocking a hidden camera feature, it’s generating the overlay independently on your phone from the video feed it receives. The peaking display only exists on your iPhone or iPad screen — it doesn’t get baked into the photo or video file, and it doesn’t change anything about how the camera itself focuses.
Step-by-Step: Using Focus Peaking with Shutter+
-
Connect your camera to Shutter+. Use Wi-Fi (the camera creates its own network, so you don’t need internet or a home router) or a USB cable, depending on your camera and preference.
-
Open live view so you can see what the camera sees on your iPhone or iPad screen.
-
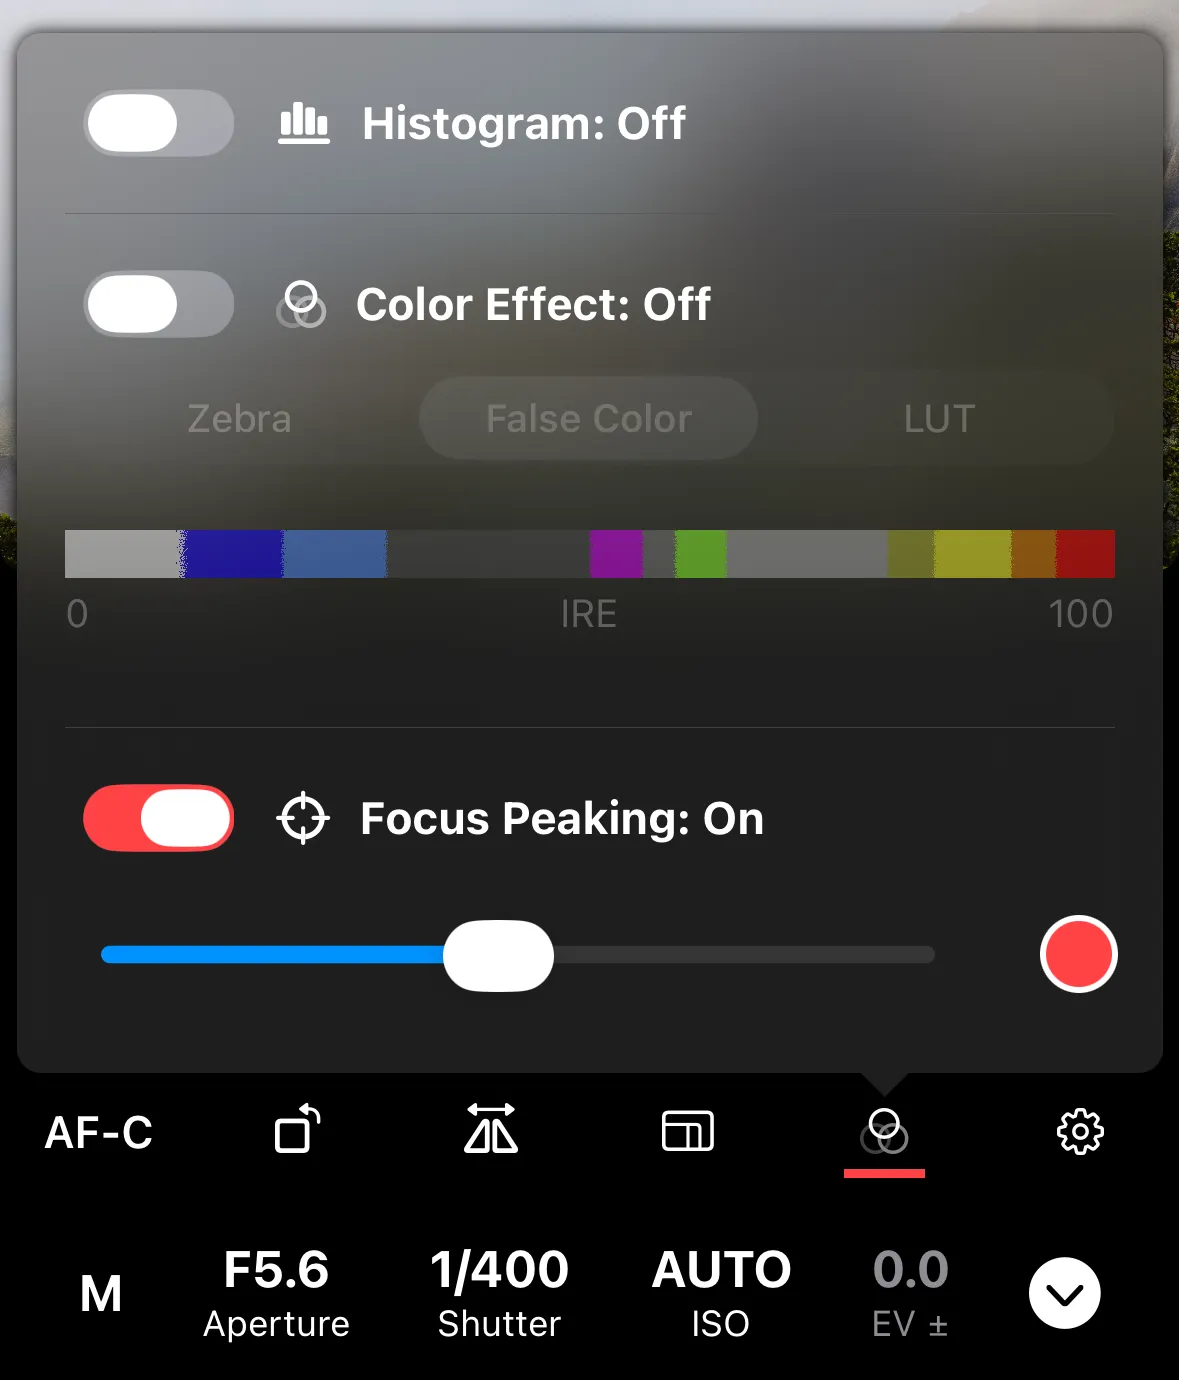
Tap the Exposure Tools icon (the three circles) below the live view. If you don’t see it, tap the arrow next to the exposure controls to reveal the additional controls row first.
-
Toggle Focus Peaking on. The colored overlay appears immediately over any in-focus edges in the frame.
-
Set your camera’s focus mode to Manual (MF) or Direct Manual Focus (DMF) through the camera’s own switch, if you want full manual control.
-
Adjust focus using the lens’s focus ring, or the on-screen pull-focus arrows in Shutter+ if you’d rather focus remotely without touching the camera. Watch the peaking overlay shift as you go: for more detail on the on-screen controls, see the manual focus control guide.
-
Once the area you want is outlined, take the shot as normal — with the shutter button on the camera, through Shutter+, or from the Apple Watch app.
Choosing the Right Color and Threshold
Shutter+ gives you two settings to fine-tune the overlay:
Color — pick between green, red, or white. The default is green, but green disappears against foliage, and red gets lost against skin tones or anything reddish. Choose whichever color contrasts most with your specific subject; switching before a shoot takes a couple of seconds and saves you squinting at an overlay you can barely see.
Threshold — this controls how sensitive the detection is. A lower threshold flags more edges, including areas that are only slightly out of focus, which is useful when you want a broad sense of what’s roughly sharp. A higher threshold only highlights the sharpest edges, which is better when you need to nail focus on one precise point, like an eye or a macro subject’s edge.
One limitation worth knowing: focus peaking can’t run at the same time as Shutter+‘s zebra stripes, false color, or LUT preview. Turning on any of those color-based exposure tools switches focus peaking off, and vice versa, since they all use the same overlay layer on the live view.
Common Mistakes to Avoid
-
Using a peaking color that blends into the scene. If you can’t see the highlights clearly, they’re not helping you. Switch colors rather than squinting.
-
Trusting peaking blindly on a very shallow depth of field. At wide apertures on close subjects, the “in focus” zone can be thinner than the peaking overlay suggests. Zoom in to confirm on shots where getting it wrong is costly.
-
Forgetting to switch back to autofocus. If you leave the camera in Manual or DMF mode after a manual-focus session, autofocus won’t re-engage until you switch modes again.
-
Not adjusting the threshold for the subject. A low threshold on a busy, high-contrast scene can highlight so much of the frame that the overlay stops being useful. Bump it up when the whole image looks “peaked.”
A Few Practical Uses
For macro photography, where depth of field might only cover a few millimeters, focus peaking combined with a high threshold setting lets you see precisely which plane is sharp before committing to a shot. If you’re stacking multiple frames for extended depth of field, focus peaking is also a good sanity check before running an automated sequence like Sony focus bracketing.
For portraits with vintage or manual lenses, set peaking to a color that contrasts with skin tones (white or green usually work better than red), and use a mid-range threshold so you can see the eye lashes and eyebrow edges clearly without the whole face lighting up.
For video, a lower threshold with a subtle color like white tends to be less distracting on camera while still giving you enough information to pull focus smoothly between two points.
Frequently Asked Questions
What does focus peaking actually show me?
It highlights the edges in your live view that currently have the sharpest contrast, using a colored outline. It’s an approximation of what’s in focus, not a precise distance measurement.
Does focus peaking change or appear in my photos or videos?
No. In Shutter+, focus peaking is a live view overlay only. It’s processed on your iPhone and has no effect on the actual image or video file the camera captures.
Can I use focus peaking with autofocus, or only in manual focus mode?
It works best in Manual or Direct Manual Focus mode, since that’s when you’re actively adjusting focus yourself. You can also glance at it briefly after autofocus locks to confirm the result, though the overlay is most useful while you’re turning the focus ring.
Which color should I use for focus peaking?
Whichever contrasts most with your subject. Green is the default and works well for most scenes, but switch to red or white if your subject is green, or to white if it’s reddish or skin-toned.
Why doesn’t my camera have a focus peaking option in its menu?
Not every camera manufacturer includes it, particularly on DSLRs, entry-level bodies, and older camera generations. It’s more common on higher-end and newer mirrorless cameras.
Can Shutter+ add focus peaking to a camera that doesn’t have it built in?
Yes. Because Shutter+ processes the peaking overlay on your iPhone or iPad from the live view feed rather than relying on the camera’s own firmware, it can add focus peaking to any supported camera, including models whose manufacturer never added the feature.
Does focus peaking work over Wi-Fi, or do I need a USB cable?
Either. Shutter+ supports both wireless connection (the camera creates its own Wi-Fi network, so no internet or router is needed) and USB tethering, and focus peaking works the same way over both.
Is focus peaking better than zooming in to check focus?
They’re complementary. Zooming in is more precise for one static point, but only shows a single area at a time. Focus peaking covers the whole frame continuously, which makes it faster for video and for tracking focus as you adjust it — many photographers use peaking to get close, then zoom in to confirm on important shots.
Related Guides
-
Manual Focus Control — how to pull focus remotely from the app, useful alongside focus peaking when you don’t want to touch the camera.
-
Sony: Focus Bracketing — for macro and landscape work where you need more depth of field than one frame can give you.
-
Zebra Stripes — another live view overlay, this one for checking exposure rather than focus.
-
Supported Cameras — check whether your Sony, Canon, or Fujifilm camera works with Shutter+.