How to View and Photograph a Solar Eclipse Safely Using a Camera Remote Control App
By Ian Middleton · Travel & landscape photographer
The safest way to photograph a solar eclipse is to never look at the sun directly or through an optical viewfinder. Fit your lens with a certified solar filter, then compose and check focus on your phone or tablet screen using a camera remote app instead of putting your eye anywhere near the camera. That’s the whole idea behind shooting an eclipse with a remote app like Shutter+: your eyes stay on a screen, not on the sun.
Eclipses don’t happen often in any given location, and the temptation to keep checking focus through the viewfinder or squinting up at the sky is real. This guide covers eye safety, gear, camera settings, and exactly how a remote app fits into the process — whether you’re shooting your first partial eclipse or planning for totality.
Why You Should Never Look at the Sun Through a Viewfinder
A camera lens, especially a telephoto lens, works the same way as a magnifying glass. Point it at the sun without protection and you’re concentrating sunlight and heat onto a single point — in this case, your retina. There are no pain receptors inside the eye, so damage can happen before you even feel anything, and it can be permanent.
This applies to any optical path between your eye and the sun: binoculars, telescopes, and DSLR optical viewfinders, which show you the scene directly through the lens. Mirrorless cameras with electronic viewfinders (EVFs) show a digital feed rather than a direct optical path, which removes the direct-line-of-sight risk, but the underlying rule doesn’t change — if there’s no solar filter on the front of the lens, both your camera’s sensor and your eyes are at risk the moment the lens points anywhere near the sun.
The safest habit, regardless of camera type, is to keep your eye away from any eyepiece entirely during an eclipse and compose using a screen instead.
The Safest Way to Compose: Use Your Phone as a Remote Monitor
This is where a camera remote app changes how you shoot an eclipse. Instead of hunching over a viewfinder or squinting at a camera’s small rear LCD in bright daylight, Shutter+ streams your camera’s live view to your iPhone or iPad over USB or a wireless connection. You compose, check focus, and monitor exposure on a screen you’re holding at a comfortable distance from your face — not an eyepiece pointed toward the sun.
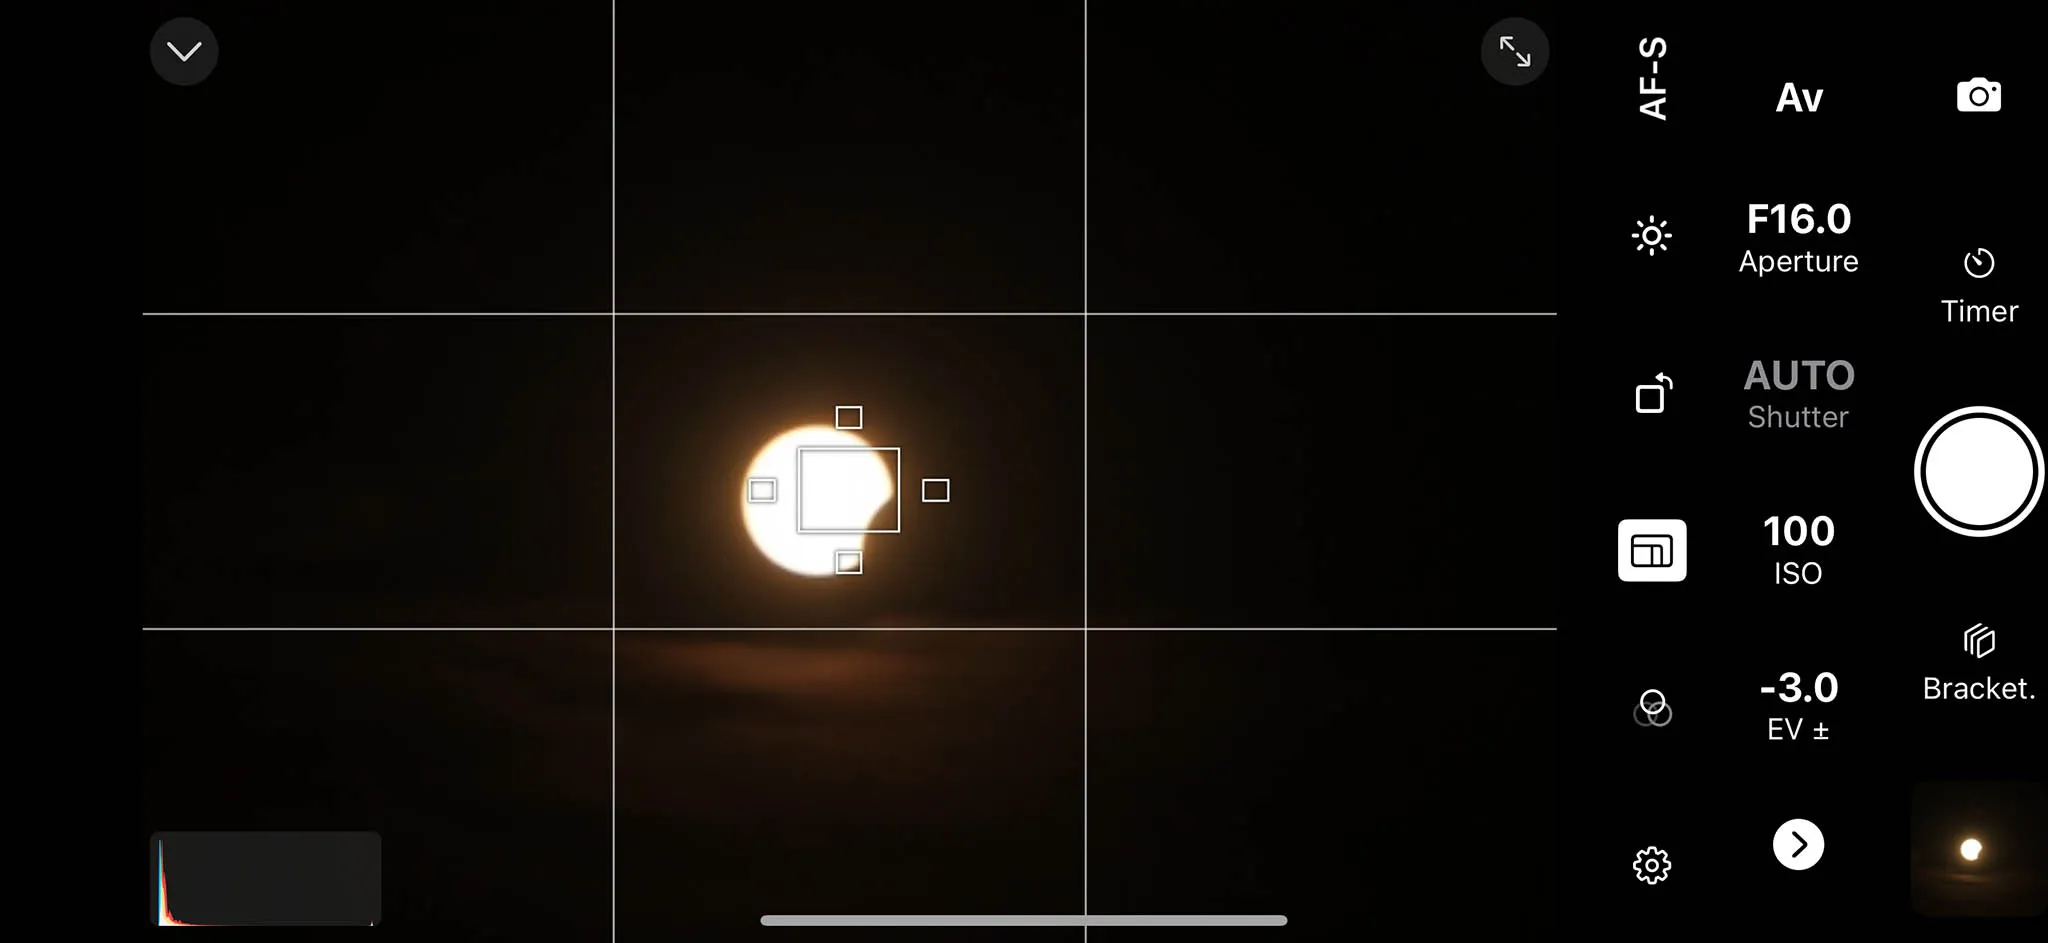
A few practical reasons this matters on eclipse day:
-
You never need to put your eye near the lens axis. Framing, refining composition, and confirming focus all happen on the phone or tablet screen in your hands.
-
A larger screen is easier to judge exposure on. An iPad’s screen makes it far easier to read a live histogram or spot a blown-out highlight around the sun’s edge than a 3-inch camera LCD in full daylight.
-
You can step back from the camera entirely. Because Shutter+ connects wirelessly or by USB, you can set the camera and tripod up, then operate everything from a few feet away — useful if you’ve got kids or other people near the equipment.
-
Your own eyes stay protected for naked-eye viewing. Wear ISO 12312-2 certified eclipse glasses when you want to look at the sun directly with your own eyes, and let the phone screen handle everything related to the camera.
None of this replaces a proper solar filter on the lens — that’s still essential and covered below — but it removes the habit of leaning into a viewfinder to check your shot, which is one of the easiest ways to end up looking at unfiltered, magnified sunlight without thinking about it.
Essential Gear Before You Shoot
-
A certified solar filter for your lens. It must cover the entire front element and be rated for direct solar viewing/photography (commonly ND 5.0, roughly a 100,000x light reduction). This is different from a standard photographic ND filter used for long exposures — don’t substitute one for the other.
-
ISO 12312-2 certified eclipse glasses, for looking at the sun with your own eyes when you’re not viewing through the camera.
-
A sturdy tripod. At longer focal lengths the sun moves through the frame quickly, and you’ll be re-centering the shot often.
-
A telephoto lens if you want the sun to appear reasonably large in the frame — 300mm and up is a common starting point. A wider lens works well if you’re going for a landscape shot that includes the eclipsed sun in context.
-
An iPhone or iPad with Shutter+ installed, with your camera model checked against the supported camera list in advance.
-
An Apple Watch, optionally, for triggering the shutter without touching your phone or the camera.
Setting Up Your Gear
-
Test everything a few days beforehand. Attach the solar filter, point at the sun, and practice focusing and dialing in exposure so eclipse day itself isn’t the first time you’re doing this.
-
Attach the solar filter before pointing the lens anywhere near the sun. Every time. No exceptions during partial phases.
-
Mount the camera on the tripod and get a rough frame on the sun.
-
Connect Shutter+ to your camera — USB is worth considering for eclipse day specifically, since it’s the most reliable connection if you’re shooting from a crowded public viewing site where wireless networks get congested.
-
Use live view on your phone or iPad to fine-tune framing and focus, rather than the camera’s own screen or viewfinder.
-
Switch to manual focus and lock it once you’re sharp on the sun’s edge or a sunspot. Autofocus can hunt on a mostly featureless disk, and you don’t want it re-hunting mid-eclipse.
Camera Settings for Each Phase of the Eclipse
Settings depend on your specific filter’s density, your lens, and local atmospheric conditions, so treat these as a starting point to refine using the live histogram rather than fixed numbers to copy exactly.
Partial phases (filter on): Start around manual mode, ISO 100, f/8–f/11, and 1/1000s, then adjust shutter speed up or down based on what the live histogram on your phone shows. Every filter is slightly different, so a test shot with the histogram is more reliable than a formula.
Baily’s beads and the diamond ring effect (brief transition moments): Brightness changes quickly here as the last direct sunlight disappears behind the moon’s edge. A burst of bracketed exposures gives you a much better chance of catching this than trying to nail one exposure manually in the moment.
Totality (filter off — only within the path of totality, and only during totality): Once totality begins, remove the solar filter — this is the one point in the whole event where it’s safe to view and photograph the sun without one, because the moon is fully blocking the photosphere. The corona spans a huge dynamic range, from the bright inner corona to faint outer streamers, so a single exposure won’t capture all of it. This is exactly the kind of moment where bracketing a range of shutter speeds (roughly 1/1000s down to 1–2 seconds, aperture and ISO fixed) gives you images you can blend later for detail across the whole corona. The instant totality ends, the filter goes back on before the sun reappears.
How Shutter+ Fits Into Eclipse Photography
Shutter+ doesn’t have an “eclipse mode” — it’s a general-purpose remote control app for Sony, Canon, and Fujifilm cameras — but several of its existing features map directly onto what an eclipse actually demands from you:
-
Live view with histogram, zebra stripes, and false color let you dial in exposure through the filter using real data from your phone screen, rather than guessing based on how bright the sun looks by eye.
-
Exposure bracketing lets you fire off a pre-set sequence of exposures with one tap — genuinely useful during totality, where you have a couple of minutes at most and no time to be turning dials for each shot.
-
The intervalometer can capture the full arc of the eclipse as a sequence of images at set intervals, so you get a progression from first contact to totality and back without manually triggering the camera every few minutes.
-
Tap-to-focus with a focus indicator lets you confirm you’re sharp on the sun’s edge from the live view before locking to manual focus.
-
Apple Watch support means you can trigger the shutter from your wrist — handy if you want to be hands-free for eclipse glasses, helping other people nearby, or simply not touching the camera and risking it moving on the tripod.
-
USB and wireless connectivity both work, with USB being the steadier option if you expect a crowded site with heavy Wi-Fi traffic.
A single Shutter+ purchase covers every supported camera from your chosen brand, and the app is available as separate downloads for Sony, Canon, and Fujifilm cameras — download the one that matches your gear and check your exact model against the supported camera list before eclipse day, since it’s worth confirming compatibility with time to spare rather than finding out the morning of.
Common Mistakes to Avoid
-
Not testing beforehand. Eclipse day is the wrong time to discover your filter is too dark, too light, or that your connection keeps dropping.
-
Removing the filter during partial phases, even briefly, to “check something.” Don’t.
-
Leaving the filter on during totality. You’ll get nothing but black frames during the only window where the corona is visible.
-
Being slow to refit the filter as totality ends. The transition back to partial phase happens fast, and this is the moment people most often get caught out.
-
Underestimating how quickly the sun moves out of frame at long focal lengths — plan on re-centering the shot regularly.
-
Relying on a phone camera alone for close-up shots. A phone’s built-in lens will render the sun as a tiny dot; it’s fine for wide, ambient shots of the darkening sky and landscape, but not for a detailed disk or corona shot.
Do You Need a Dedicated Camera, or Is a Phone Enough?
A phone alone captures the atmosphere well — the darkening sky, the strange quality of light, people’s reactions — but without an add-on telephoto lens, the sun itself will be a small point in the frame. A mirrorless or DSLR camera with a longer lens, a proper solar filter, and a remote app for hands-off control is what gets you a detailed, well-exposed shot of the eclipsed sun itself. Many photographers do both: a phone or wide lens for context shots, and a telephoto setup on a tripod, controlled remotely, for the close-up.
FAQ
Is it safe to look at a solar eclipse through my phone screen?
Yes. You’re looking at a screen, not the sun directly, so there’s no risk to your eyes from viewing the live feed. The camera lens itself still needs a certified solar filter during all partial phases, both to protect the sensor and to avoid a completely blown-out image.
Can I look through my camera’s viewfinder during an eclipse?
Only with a solar filter fitted to the lens. Without one, even a brief look through an optical viewfinder exposes your eye to magnified, unfiltered sunlight. Using a remote app to view live view on your phone instead removes this risk, since you’re never lining your eye up with the lens.
What filter strength do I need for eclipse photography?
Look for a filter specifically rated for solar viewing or photography, typically around ND 5.0 (roughly a 100,000x reduction in light), meeting the ISO 12312-2 standard. A standard photographic ND filter used for long exposures is not a substitute and isn’t safe for this purpose.
Do I need the solar filter on during totality?
No — and you shouldn’t use one during totality, or you won’t capture anything. The filter comes off only once the moon fully covers the sun, and only if you’re within the path of totality. It goes back on the instant totality ends.
What camera settings should I start with for eclipse photography?
For partial phases with a filter on, a common starting point is manual mode, ISO 100, f/8–f/11, and roughly 1/1000s, refined using the live histogram. For totality, bracket a range of shutter speeds from around 1/1000s to 1–2 seconds to capture both the bright inner corona and fainter outer detail.
Does Shutter+ need an internet connection to work at an eclipse viewing site?
No. Shutter+ connects directly to your camera over Wi-Fi Direct or USB, not through a broader internet connection, which matters at outdoor viewing sites where mobile data and public Wi-Fi are often overloaded.
Will Shutter+ work with my specific camera model?
Shutter+ supports a wide range of Sony, Canon, and Fujifilm cameras, but not every model. Check your exact model against the supported camera list on the Sony, Canon, or Fujifilm pages before eclipse day.
How far in advance should I test my eclipse photography setup?
At least a few days, ideally in similar sunny conditions. Test the filter, exposure settings, focus, and the connection between your camera and phone so eclipse day is just execution, not troubleshooting.
Related Guides
-
Exposure Bracketing & Lens Flare Removal with Shutter+ and Photoshop — a walkthrough of using exposure bracketing to capture a scene’s full dynamic range and blend it afterward, the same technique this guide recommends for the corona during totality.
-
How to Use BULB Mode for Long Exposure Photography — useful if you’re also planning to shoot the night sky or star trails around your eclipse trip, using the same remote-triggering principles.
-
Video Guide to All Features on Shutter+ — a full walkthrough of live view, bracketing, and the intervalometer, worth watching before eclipse day if you’re new to the app.
-
What Is an Intervalometer? And How to Use One on Your Camera — a closer look at setting up the interval sequences used to capture an eclipse’s progression from first contact to totality.
-
How to Photograph Lightning Safely: Complete Guide — another guide built around shooting an unpredictable sky event remotely, with safety as the first consideration.
-
How to Read a Camera Histogram in Photography — a deeper explanation of the histogram tool this guide relies on to judge exposure through a solar filter.