What Is an Intervalometer? And How to Use One on Your Camera
An intervalometer is a timer that fires your camera’s shutter automatically, over and over, at a fixed interval you set in advance — every 2 seconds, every 30 seconds, every hour — for as long as you need it to run. It’s the tool behind almost every time-lapse video and star-trail photo you’ve ever seen, and it’s one of the most useful camera features most people never end up using.
In this guide: what an intervalometer actually does, how it’s different from your camera’s continuous shooting (burst) mode, when to reach for one, and how to set one up — including a much easier way to run an intervalometer using nothing but your iPhone or iPad.
What Is an Intervalometer?
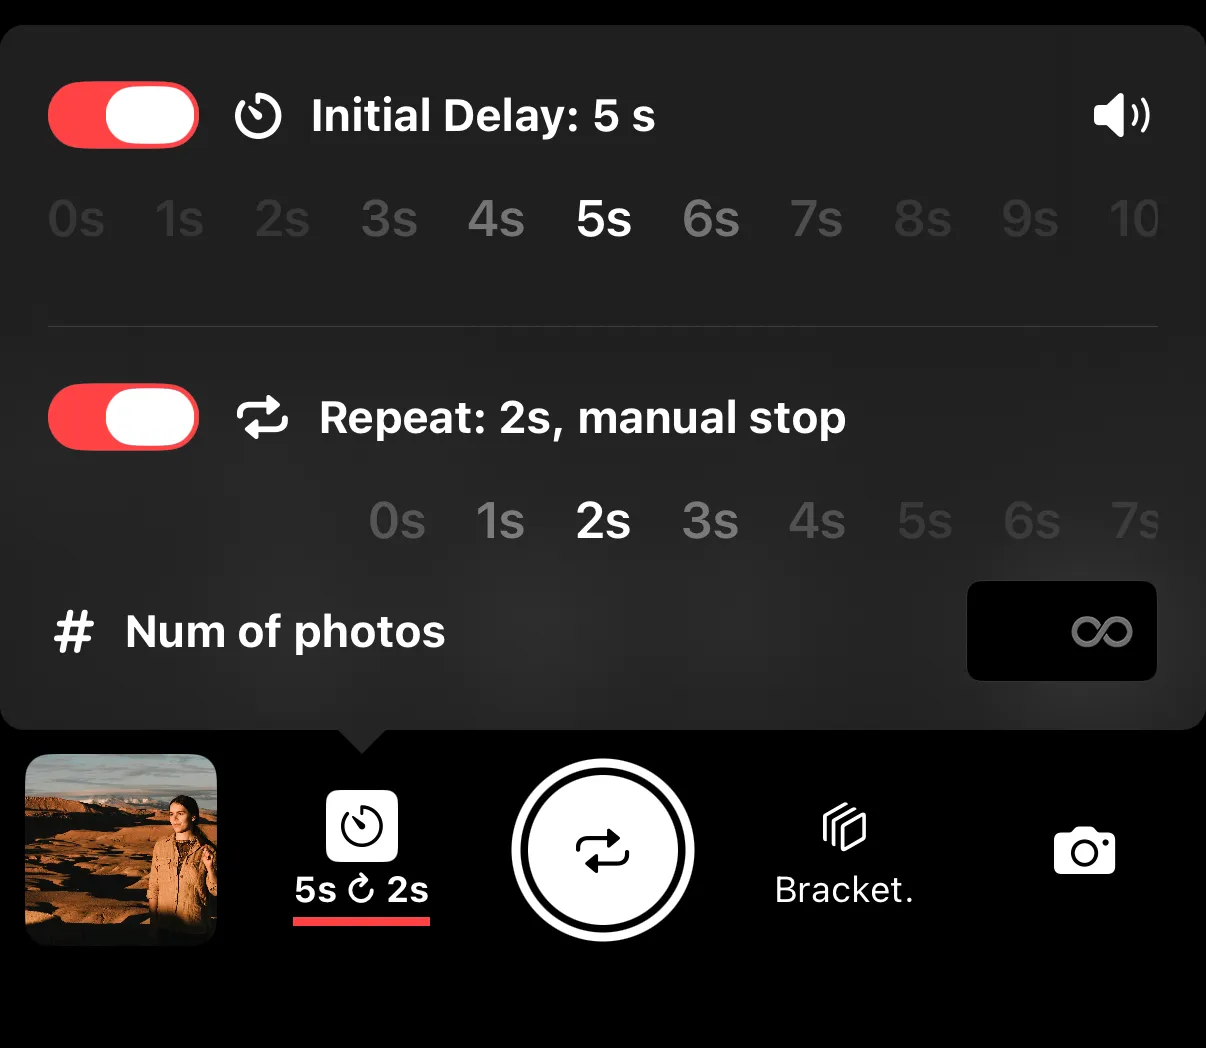
Essentially, an intervalometer is simple: you tell it how long to wait before the first shot, how much time to leave between each shot after that, and how many shots to take (or just let it run until you stop it) — then it handles the rest, firing the shutter on its own so you don’t have to stand there pressing a button for the next three hours.
“Intervalometer” can refer to a few different things, depending on your setup:
-
A built-in camera feature, usually tucked into the shooting menu as “interval timer shooting” or something similar.
-
A standalone hardware remote that plugs into your camera’s remote port, with its own small screen and buttons for setting delay, interval, and shot count.
-
An app-based intervalometer, like the one built into Shutter+, that runs on your phone and talks to your camera over Wi-Fi or USB.
All three do the same basic job. What separates them is how easy they are to program, how much else you can control while the sequence runs, and how well you can check in on a long shoot without walking back over to the tripod — more on that later.
First, it’s worth clearing up a common mix-up: how an intervalometer differs from continuous shooting mode.
Intervalometer vs. Continuous Shooting Mode: What’s the Difference?
It’s an easy pair to confuse, since both fire the shutter repeatedly without you pressing the button for every single frame. But they solve opposite problems.
Continuous shooting mode (also called burst mode) fires as many frames as your camera’s frame rate allows for as long as you hold the shutter button down — often several frames per second. It exists to catch one fast, unpredictable moment: the instant a bird takes flight, a ball connects with a bat, or when everyone in a group photo actually has their eyes open at the same time.
An intervalometer does the opposite job. It spaces single frames apart at an interval you choose — seconds, minutes, or hours — and keeps going, hands-free, for as long as you’ve told it to. It exists to document gradual change over a long stretch of time, using only as many frames as you actually need.
| Continuous Shooting (Burst) | Intervalometer | |
| How it fires | Rapidly, while you hold the button | One frame at a time, at a set interval |
| Typical duration | A few seconds | Minutes to days |
| Hands-free? | No — you hold the button down | Yes — runs on its own once started |
| Best for | Fast, unpredictable action | Gradual change over a long period |
| Common uses | Sports, wildlife, kids and pets | Time-lapse, astrophotography, image stacking |
It’s worth noting that Shutter+ itself keeps these as two distinct tools in the app — a dedicated Burst Shooting mode for fast continuous frames, and a separate Timer/Intervalometer mode for spaced-out, automated sequences — because they’re genuinely built for two different jobs. If you’re ever unsure which one you need, ask whether you’re trying to freeze one moment or capture many moments spread across a longer stretch of time. The former is burst mode. The latter is exactly what an intervalometer is for.
When Should You Use an Intervalometer?
Time-Lapse Photography
The most familiar use case: clouds rolling across the sky, a sunset fading into blue hour, a city intersection from day to night, a flower opening over a few days. Set an interval — a few seconds for fast-moving clouds, a bit longer for a sunset, minutes or hours for something as slow as construction progress — and let the camera collect the hundreds of frames you’ll later stitch into a video.
Astrophotography
Intervalometers are essential kit for photographing the night sky. Star-trail images are built from dozens of consecutive long exposures — commonly 15–30 seconds each — stacked together afterward in software, and there’s no realistic way to fire thirty-plus exposures back to back by hand without introducing shake or gaps between frames. An intervalometer paired with a bulb timer also lets you shoot a sequence of long exposures for noise-reduction stacking, or capture a night-sky time-lapse of the Milky Way arcing overhead.
Long Exposures and HDR Bracketing
Anything that benefits from nobody touching the camera — waterfalls, seascapes, light trails, repeated exposure brackets as the light shifts through sunrise or sunset — is a good candidate. Triggering the shutter remotely rather than pressing it also avoids the small amount of shake a physical button press can introduce into a long exposure.
Wildlife and Remote Monitoring
Camera traps, nest-box monitoring, or documenting a build-out over several weeks all rely on a camera that can fire on a schedule with nobody present.
Self-Portraits and Group Shots
A lighter use, but a common one: set a delay and a repeating interval, and you can take several shots in a row while you get into position — far less painful than resetting a 10-second self-timer over and over between poses.
Built-In, External, or App: Where Does Your Intervalometer Come From?
Most current Canon, Sony, and Fujifilm bodies include some form of built-in interval timer shooting in the menu — but how good it is varies a lot, even between models from the same brand. Some don’t refocus between shots. Some cap out at a limited number of frames or a limited exposure length. Sony in particular has a mixed reputation here: interval shooting has historically been fairly basic on many bodies, and a common complaint is that it doesn’t refocus between frames the way a more capable remote does. Older or budget bodies may not have an interval timer at all.
That gap is exactly why standalone hardware intervalometers exist — small remotes with their own screen and buttons that plug into the camera’s remote port and handle delay, interval, shot count, and often a bulb timer for long exposures. They work, but they’re one more thing to buy, charge, carry, and program by feel in the dark, usually with no way to preview what you’re actually capturing until you’re back at a computer.
The third option is an app running on a device you probably already have in your pocket: your phone.
A Better Intervalometer: Controlling Canon, Sony, and Fujifilm Cameras with Shutter+
Shutter+ turns your iPhone or iPad into a full remote control for Canon (EOS and PowerShot), Sony (Alpha and Cyber-shot), and Fujifilm (X and GFX) cameras, connecting over Wi-Fi Direct or USB — no internet or home network required, so it works just as well on a mountainside at 2 a.m. as it does in your living room. Its Timer/Intervalometer feature is built to solve the exact pain points of a standard intervalometer:
-
A real screen, not a two-line LCD: Set delay, interval, and shot count on your iPhone or iPad’s display instead of squinting at a tiny remote in the dark.
-
Refocus before each shot: An option many built-in camera intervalometers simply don’t offer — useful for sequences where focus needs to hold rock-steady, or shift gradually, across dozens of frames.
-
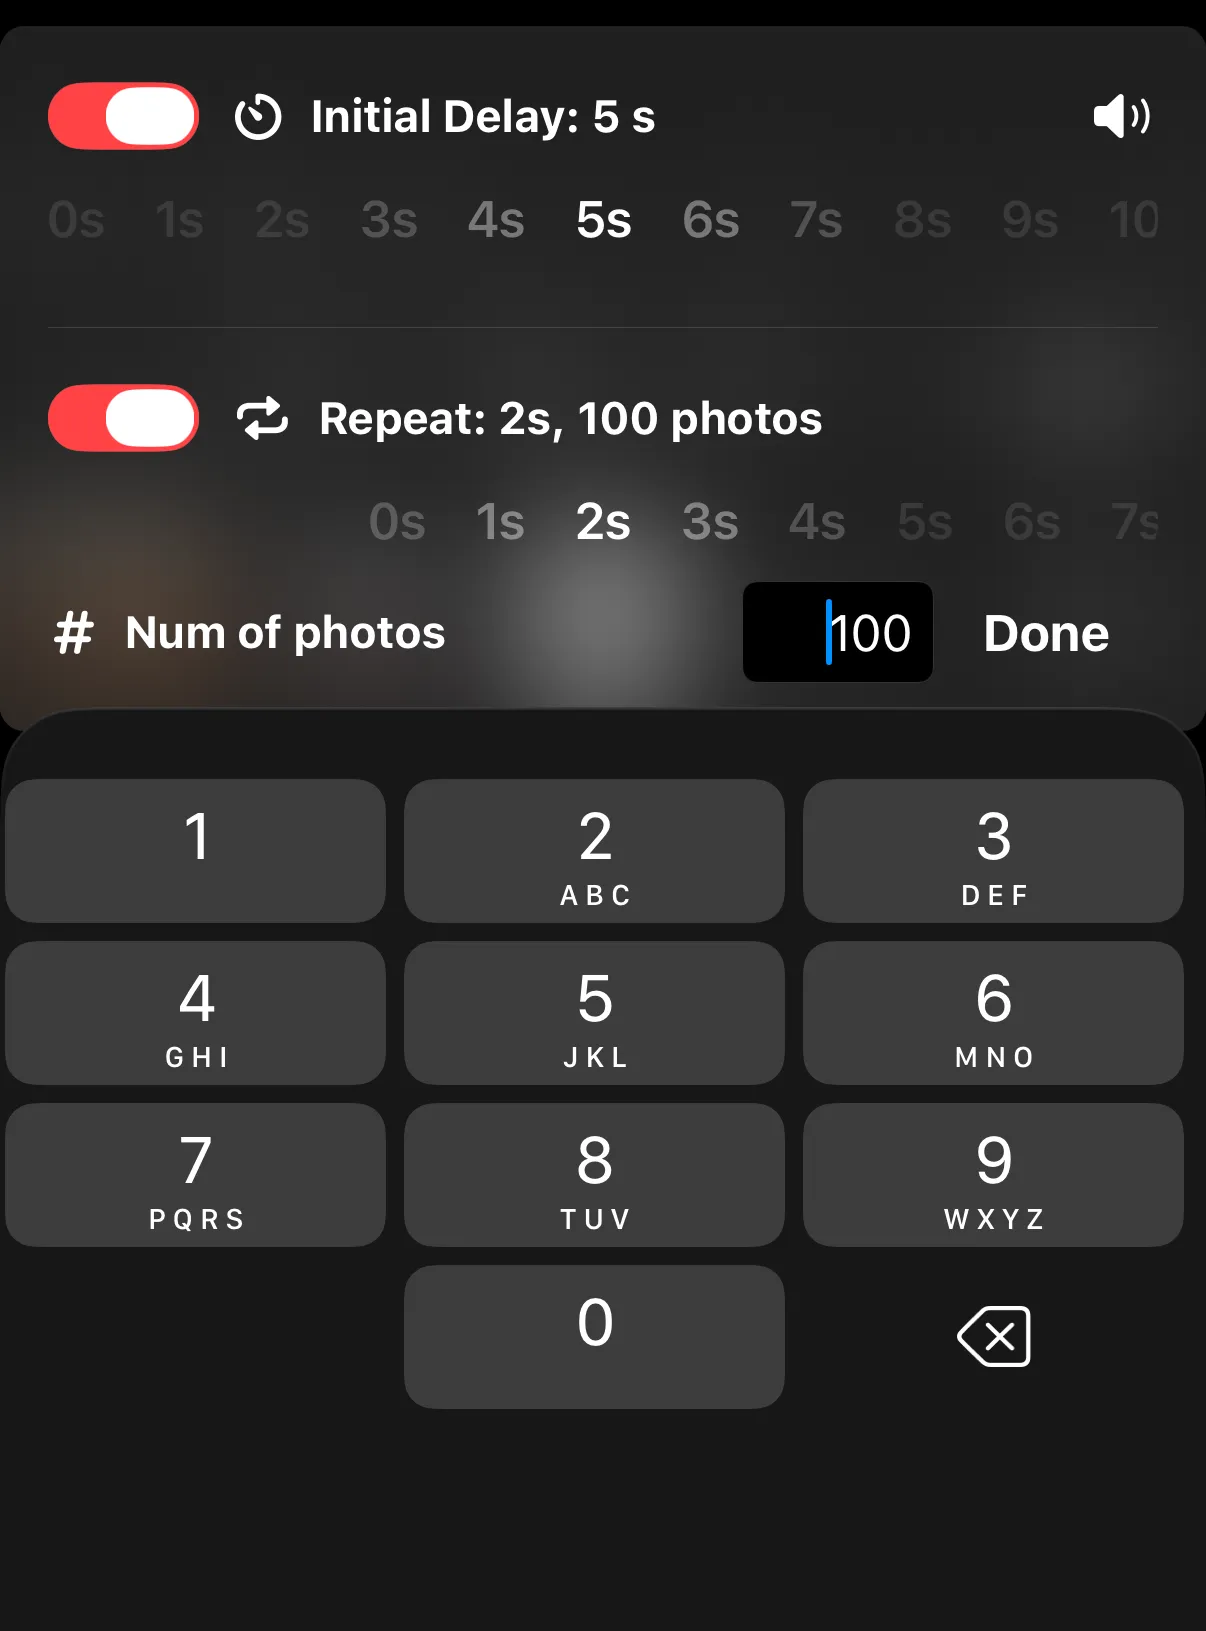
Set the number of shots you want: You can either choose to allow it run continuously until you click stop (set to infinity) or set the exact number of shots you want.
-
Combine it with the BULB Timer to shoot a sequence of long exposures beyond your camera’s standard 30-second limit — exactly what’s needed for star trails, noise-reduction stacking, and night-sky time-lapses.
-
Live histogram, zebra stripes, and false colour while the sequence runs, so you can confirm exposure is holding steady without walking over and touching the tripod.
-
Check in and adjust from your Apple Watch, including monitoring a sequence that’s already running.
-
One interface across three brands — handy if you shoot more than one system, or you’ve switched brands and don’t want to relearn a new menu from scratch.
-
Filter and download the results straight to your phone afterward, by date, rating, or file format, so you can start culling a 300-frame overnight sequence before you’re even back at the car.
How to Set Up an Intervalometer Sequence with Shutter+
-
Connect your camera to Shutter+ over Wi-Fi or USB. (Wireless connection guide)
-
Open the Timer/Intervalometer automation and set your start delay, interval, and number of shots (or let it run until you stop it). Shooting the night sky or another long-exposure sequence? Pair it with the BULB Timer to set your exact exposure length. Full walkthrough: Intervalometer guide.
-
Check composition and exposure using the live histogram before committing to a long run.
-
Start the sequence and step back — monitor progress from your phone or Apple Watch without touching the tripod.
-
Import your photos through the app once you’re done, filtering by date or rating to find your keepers fast.
Tips for Better Time-Lapse and Astrophotography Results
-
Shoot manual exposure and manual white balance. Letting the camera adjust either automatically between frames is the single most common cause of visible flicker in a finished time-lapse.
-
Watch your long exposure noise reduction setting. Left on, the camera doubles its processing time after every shot — which can eat into a short interval and cause it to miss frames entirely.
-
Bring extra power. Long overnight sequences are hard on batteries, especially in the cold; a spare battery or a power adapter is worth the extra weight in your bag.
-
Use a solid tripod. Wind and vibration show up as jitter in a time-lapse and throw off the alignment needed for stacking.
-
Test with a short run first. Before committing to an all-night sequence, shoot a five-minute test at your chosen interval and exposure to confirm everything’s dialled in.
Frequently Asked Questions
Do I need a separate intervalometer if my camera already has a built-in interval timer?
Not necessarily — it depends on how capable your camera’s built-in version is. Some don’t refocus between shots, cap the number of frames, or make it awkward to combine with long bulb exposures. If you’ve bumped into any of those limits, an app-based option like Shutter+ adds a bigger screen, live preview, and more flexibility on top of what’s already built in.
Can I use continuous/burst shooting mode instead of an intervalometer for a time-lapse?
You can, but it’s rarely the right tool. Burst mode fires as fast as your camera allows for as long as you hold the button, front-loading far more frames than you need into a much shorter window than most time-lapses actually cover, and filling your memory card fast. An intervalometer spreads single shots evenly across the entire period you want to capture.
What interval should I use for a time-lapse?
It depends on your subject and total shooting time. As a rough starting point: fast-moving clouds, 2–5 seconds; sunrise or sunset, 3–10 seconds; star trails or the night sky, 15–30 seconds (matched to your exposure length); slow subjects like construction or plant growth, anywhere from several minutes to a few hours apart.
Does using an intervalometer drain my camera’s battery faster?
Any extended session uses more battery than a single shot, particularly with live view active or long exposures in cold weather. For overnight astro or time-lapse sessions, plan for a spare battery or a power adapter regardless of which intervalometer you use.
Can I control an intervalometer from my phone instead of buying a dedicated remote?
Yes — that’s essentially what Shutter+ does. It connects wirelessly (or via USB) to compatible Canon, Sony, and Fujifilm cameras and gives you a complete intervalometer — delay, interval, shot count, live view, and a BULB timer — from your iPhone, iPad, or Apple Watch, with nothing extra to carry or charge.
Which cameras does Shutter+ support?
A wide range of Canon EOS and PowerShot, Sony Alpha and Cyber-shot, and Fujifilm X and GFX cameras. Check the full supported camera list for your specific model.
Ready to Try It Yourself?
Whether you’re planning your first Milky Way shoot or setting up a sunset time-lapse tonight, an intervalometer takes the manual labour out of long sequences — and running it from your phone makes it a lot easier to get right. Download Shutter+ for Canon, Sony, or Fujifilm and try the intervalometer with a free trial.
Related articles:
Taking Self-Portraits and Group Photos with Shutter+
How to Take Solo Travel Photos of Yourself (Without Asking a Stranger)