What Is False Color and Zebra Stripes? A Step-by-Step Guide to Reading Your Exposure
By Ian Middleton · Travel & landscape photographer
Zebra stripes and false color are two live-view tools that show you exposure problems before you press the shutter, instead of after. Zebra stripes lay a striped pattern over the parts of your image that are too bright or too dark. False color goes further and recolors the entire live view based on brightness, so you can read the exposure of a whole scene in a glance.
Both are monitoring tools. Neither one touches your actual photo or video file — they only change what you see on screen while you’re framing the shot.
If you’ve only ever seen these described in a manual for a cinema camera or a high-end mirrorless body, that’s not a coincidence. A lot of cameras — including plenty of well-loved DSLRs and entry-level mirrorless bodies — were never built with either tool. That’s where a remote control app like Shutter+ changes things: it can generate zebra stripes and false color on your iPhone’s screen from the live view feed itself, regardless of whether your camera’s own menus have ever heard of either feature. More on exactly how that works below.
What Are Zebra Stripes?
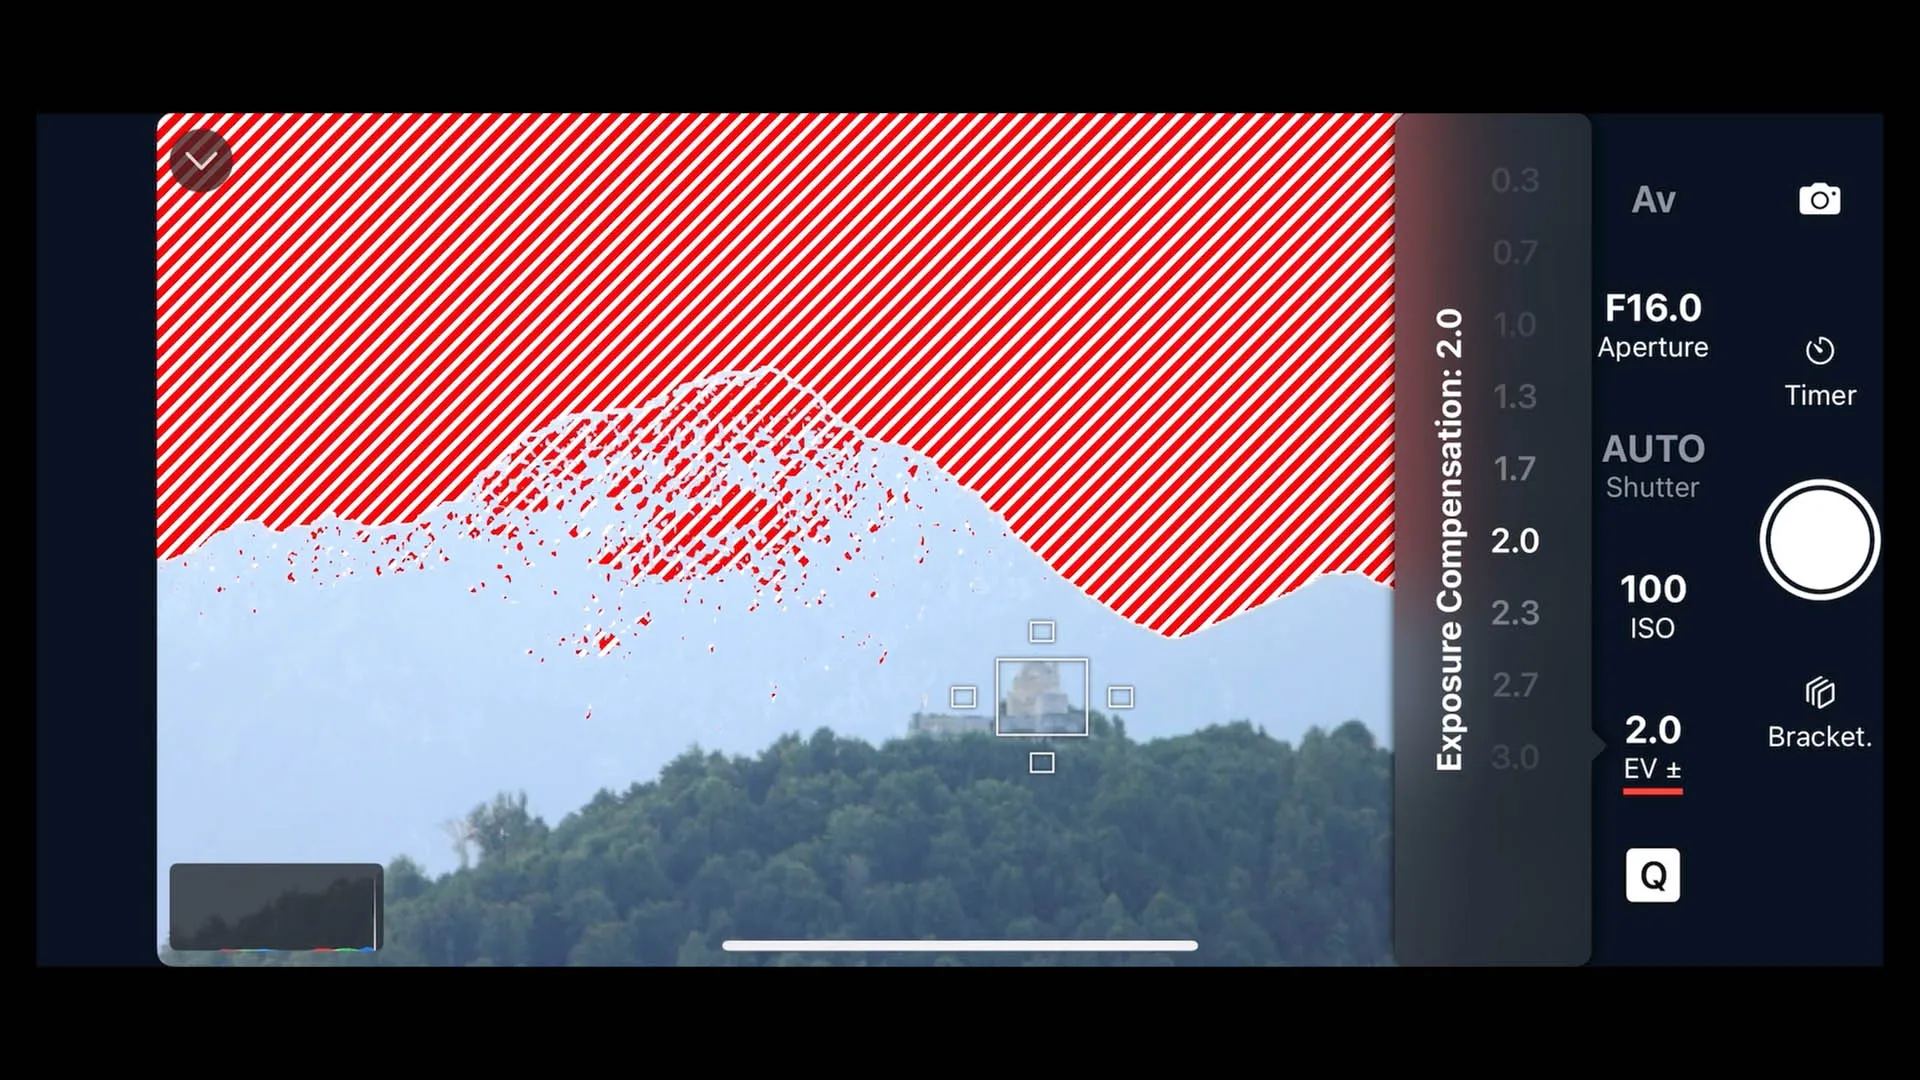
Zebra stripes overlay a pattern of diagonal lines on any part of the image that crosses a brightness threshold you set — usually the highlights that are about to blow out, sometimes the shadows too.
The rest of the frame stays in full color. Only the flagged areas get the stripes, which makes zebra stripes easy to read at a glance: no stripes, no clipping (at whatever threshold you’ve set).
A typical use case: you’re shooting a landscape with a bright sky and a shaded foreground. Turn zebra stripes on, and the sky lights up with diagonal lines the moment it crosses your threshold — telling you to dial back exposure before you lose detail in the clouds, without you having to squint at a histogram to figure out which part of the frame is the problem.
What Is False Color?
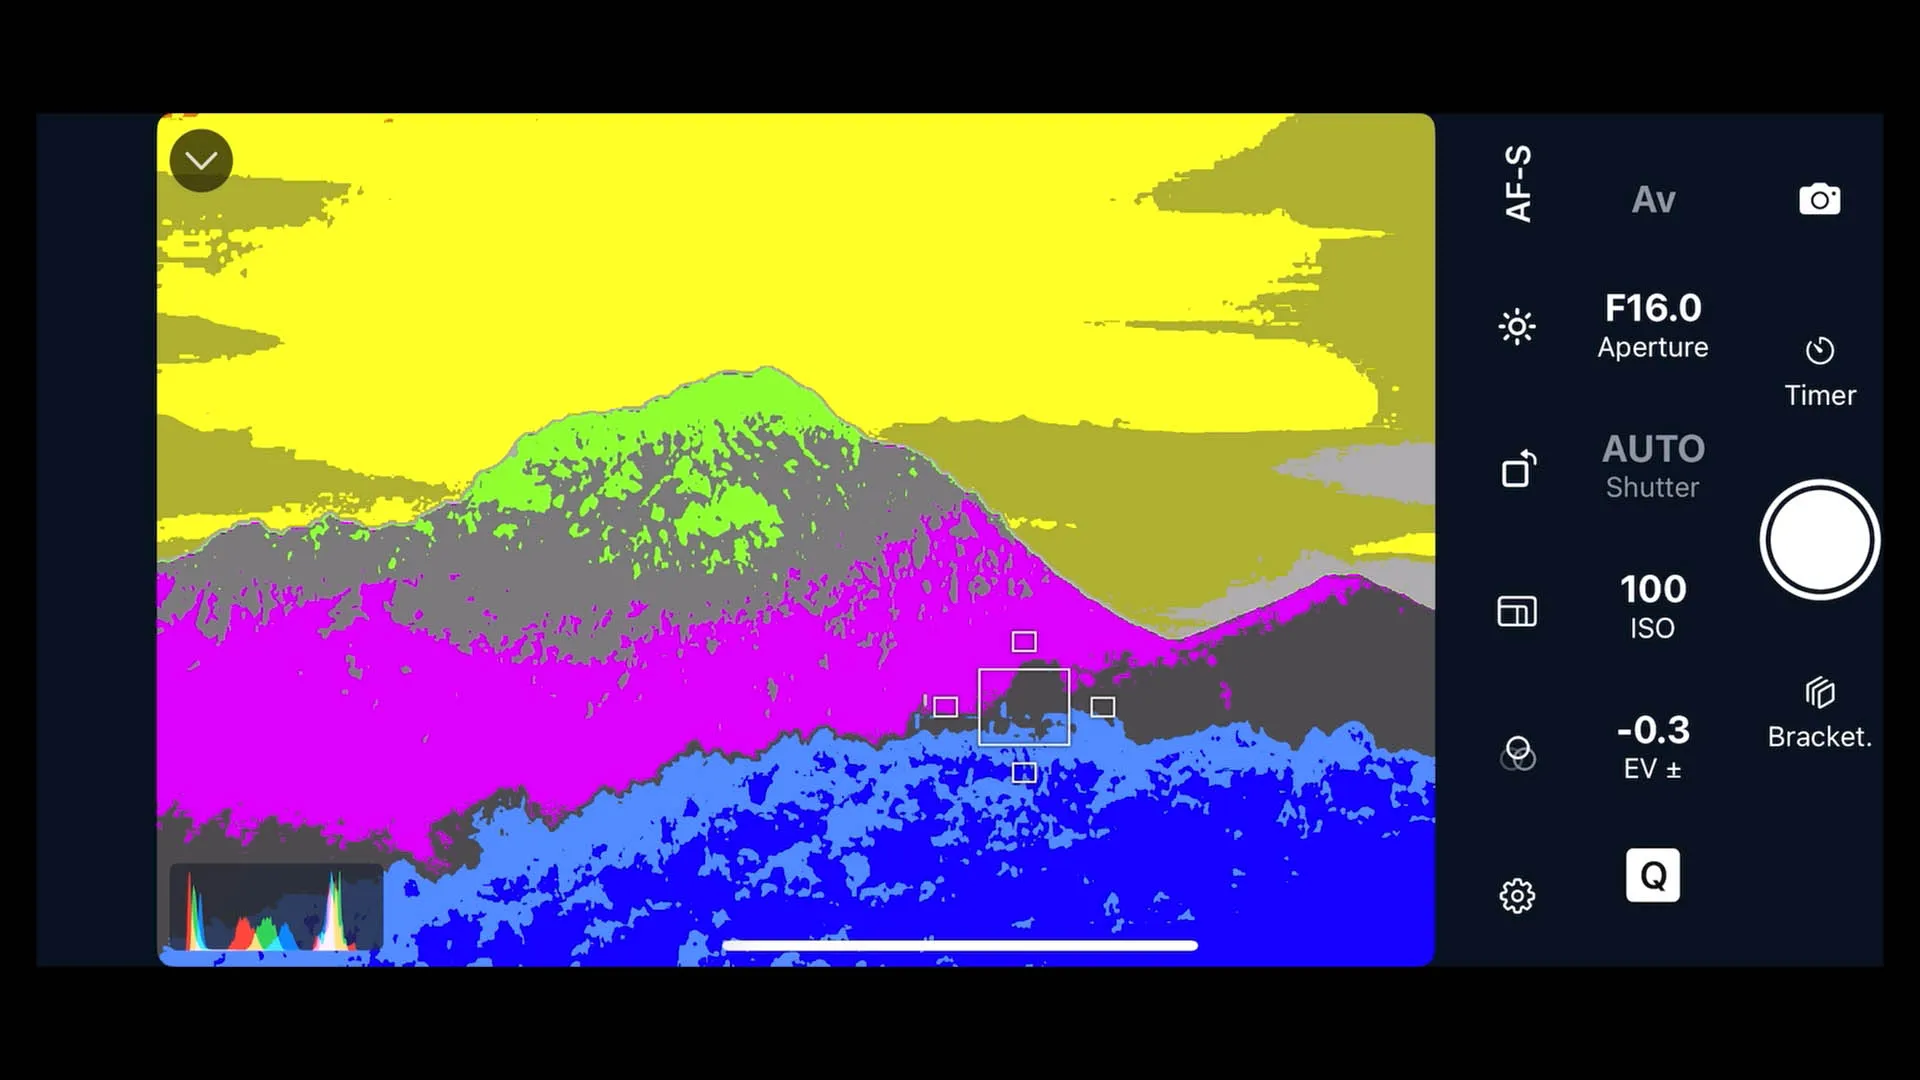
False color takes it a step further. Instead of leaving the image alone and only flagging problem areas, it replaces the entire live view with a color-coded map of brightness. Every pixel gets recolored according to how bright or dark it is, so you can read the exposure of the whole frame — not just the extremes — at once.
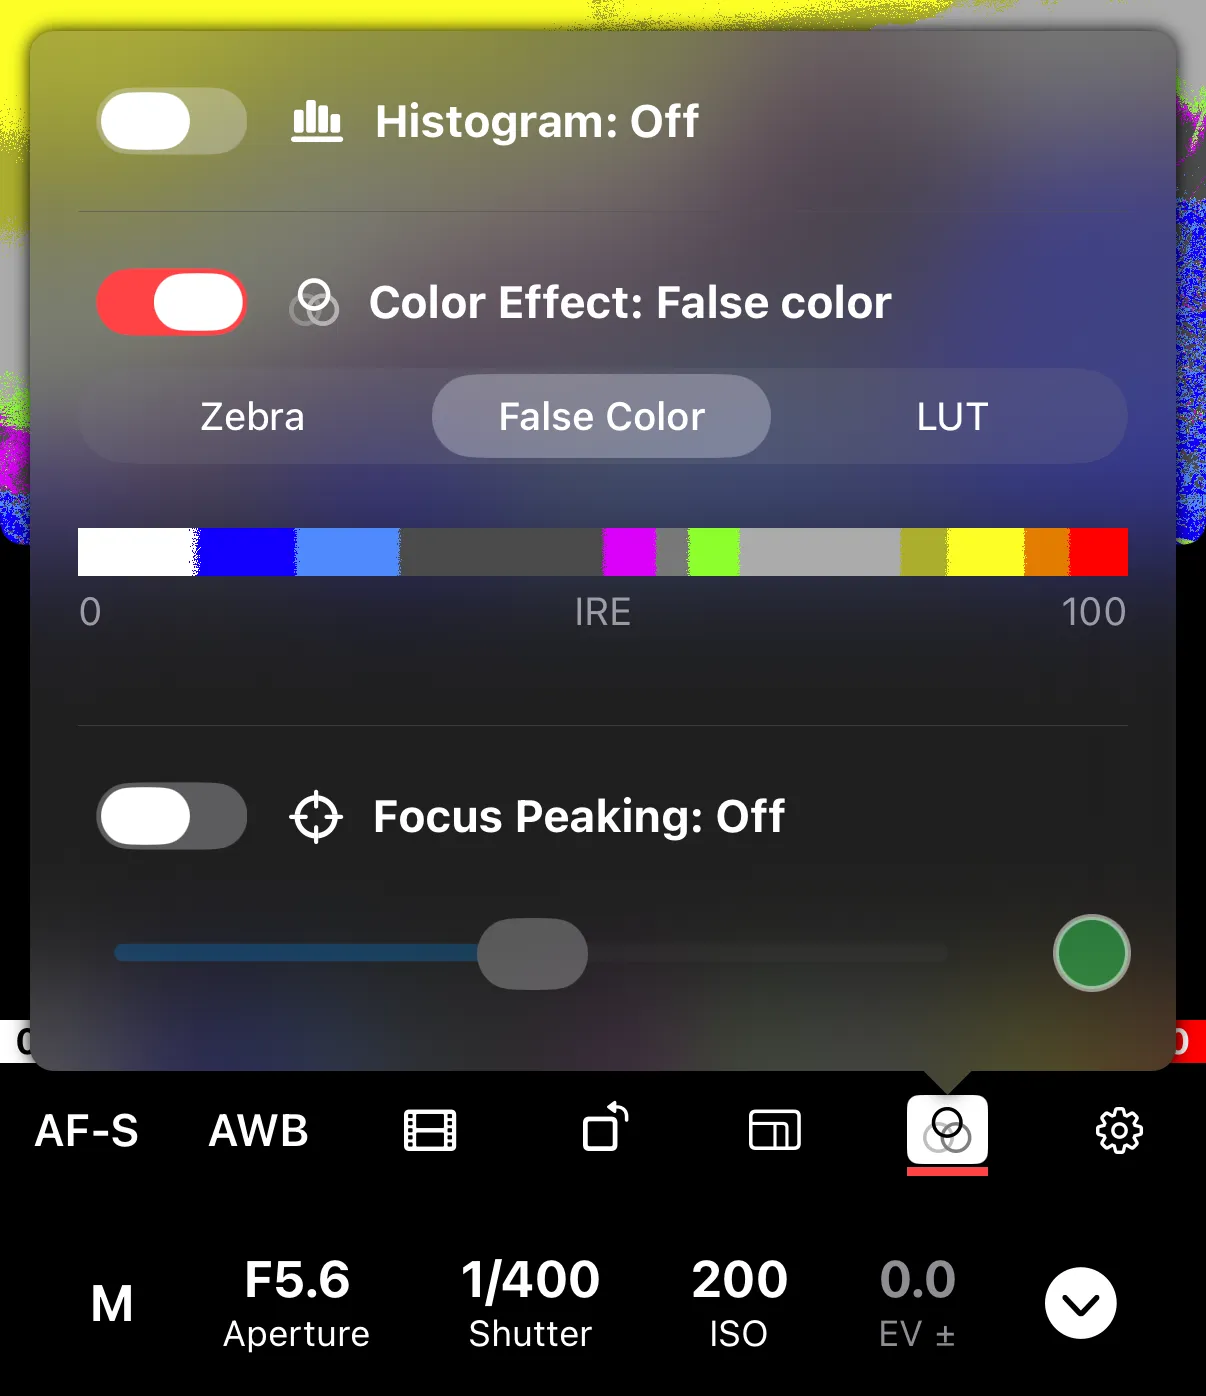
In Shutter+, the false color scale runs from 0 to 100 IRE. Darker areas show up in cool colors (blues and greens), and brighter areas show up in warm colors (yellows and reds). Correctly exposed midtones and skin tones land in the middle of that scale. A brightness key is displayed alongside the live view so you can match colors to values as you shoot.
This is especially handy for video, where you often can’t just glance at a still frame — you need to track exposure continuously as a scene changes, and false color gives you a consistent visual reference for that. It’s also useful for flat or log color profiles, which tend to look washed out on a normal screen and make it hard to judge exposure by eye alone.
Note that some other false color systems (found on dedicated video monitors and cinema cameras) use a more granular scale with specific colors reserved for things like clipped whites or ideal skin tone. Shutter+ uses a simpler blue-to-red gradient, which is easier to read at speed but worth knowing about if you’ve used false color elsewhere and expect to see, say, pink for skin tones.
False Color vs. Zebra Stripes: What’s the Difference?
| Comparison | Zebra Stripes | False Color |
|---|---|---|
| What you see | The normal image, with stripes only on flagged areas | The entire frame recolored by brightness |
| Best for | Quickly spotting clipped highlights or shadows | Reading exposure across the whole frame at once |
| Adjustable | Yes — set your own min/max brightness thresholds | Fixed 0–100 IRE scale |
| Most useful for | Landscapes, real estate, general photography | Video, log/flat profiles, matching shots for consistency |
| Affects the captured file | No | No |
They’re not competing tools — they’re answering slightly different questions. Zebra stripes tell you “is this specific area clipping?” False color tells you “how is exposure distributed across everything I can see?” Many photographers switch between the two depending on what they’re shooting.
The Problem: A Lot of Cameras Don’t Have Either Tool
Zebra stripes and false color both have roots in professional video monitoring, and they’ve only slowly made their way into stills cameras — usually starting with flagship, video-focused bodies. Entry-level DSLRs, older mirrorless cameras, and compact cameras built primarily for stills were often never given either feature in their firmware at all.
That leaves a lot of photographers stuck guessing at exposure using nothing but a small rear LCD in bright daylight, or relying on a histogram that only appears after you’ve already taken the shot.
How Shutter+ Adds Both — Even If Your Camera’s Menus Don’t Have Them
This is the part that surprises people the first time they try it: Shutter+ doesn’t ask your camera to generate zebra stripes or false color. It generates them itself, on your iPhone or iPad, from the live view video your camera is already streaming to the app.
Here’s what that means in practice. When you connect a supported camera to Shutter+, the camera sends a live video feed to your phone so you can monitor the shot. Shutter+ analyzes that feed pixel by pixel in real time — processed on the GPU for smooth performance and low battery drain — and draws the zebra pattern or false color map directly on top of it, on your screen. Your camera never needs to know any of this is happening.
Practically, this means:
-
If you’re shooting with an entry-level DSLR that was never built with in-camera exposure monitoring tools, Shutter+ still gives you both zebra stripes and false color, because the overlay lives in the app, not the camera’s firmware.
-
If your camera is older and simply predates these features, the same applies — connect it to Shutter+ and the tools are there.
-
If your camera already has zebra stripes or false color in its own menus, Shutter+ still gives you the same tools, but on a bigger, brighter iPhone or iPad screen instead of a small viewfinder or rear LCD, which is a real advantage in bright outdoor light.
It’s worth being clear about who’s doing what here. Your camera still handles the actual exposure — the shutter speed, aperture, ISO, and sensor readout that determine what gets recorded. Shutter+ only affects what you see while framing the shot; it doesn’t change anything about the file your camera captures. Think of it the same way you’d think of an external monitor with zebra or false color built in on a professional video set — except instead of a dedicated monitor, it’s the iPhone already in your pocket.
Before relying on this for a shoot, it’s worth checking your specific model on the supported cameras page to confirm your camera connects to Shutter+ over Wi-Fi or USB.
Step-by-Step: How to Turn On Zebra Stripes or False Color in Shutter+
-
Connect your camera to Shutter+. Open the app, tap Add Camera, and choose wireless or USB depending on your setup. Follow the on-screen instructions — they’re specific to your camera brand.
-
Open Live View. Once connected, you’ll see your camera’s live feed on your phone or tablet screen.
-
Find the Exposure Tools menu. Look for the icon made of three overlapping circles near the exposure controls. If you don’t see it, tap the arrow next to the exposure controls to reveal additional options.
-
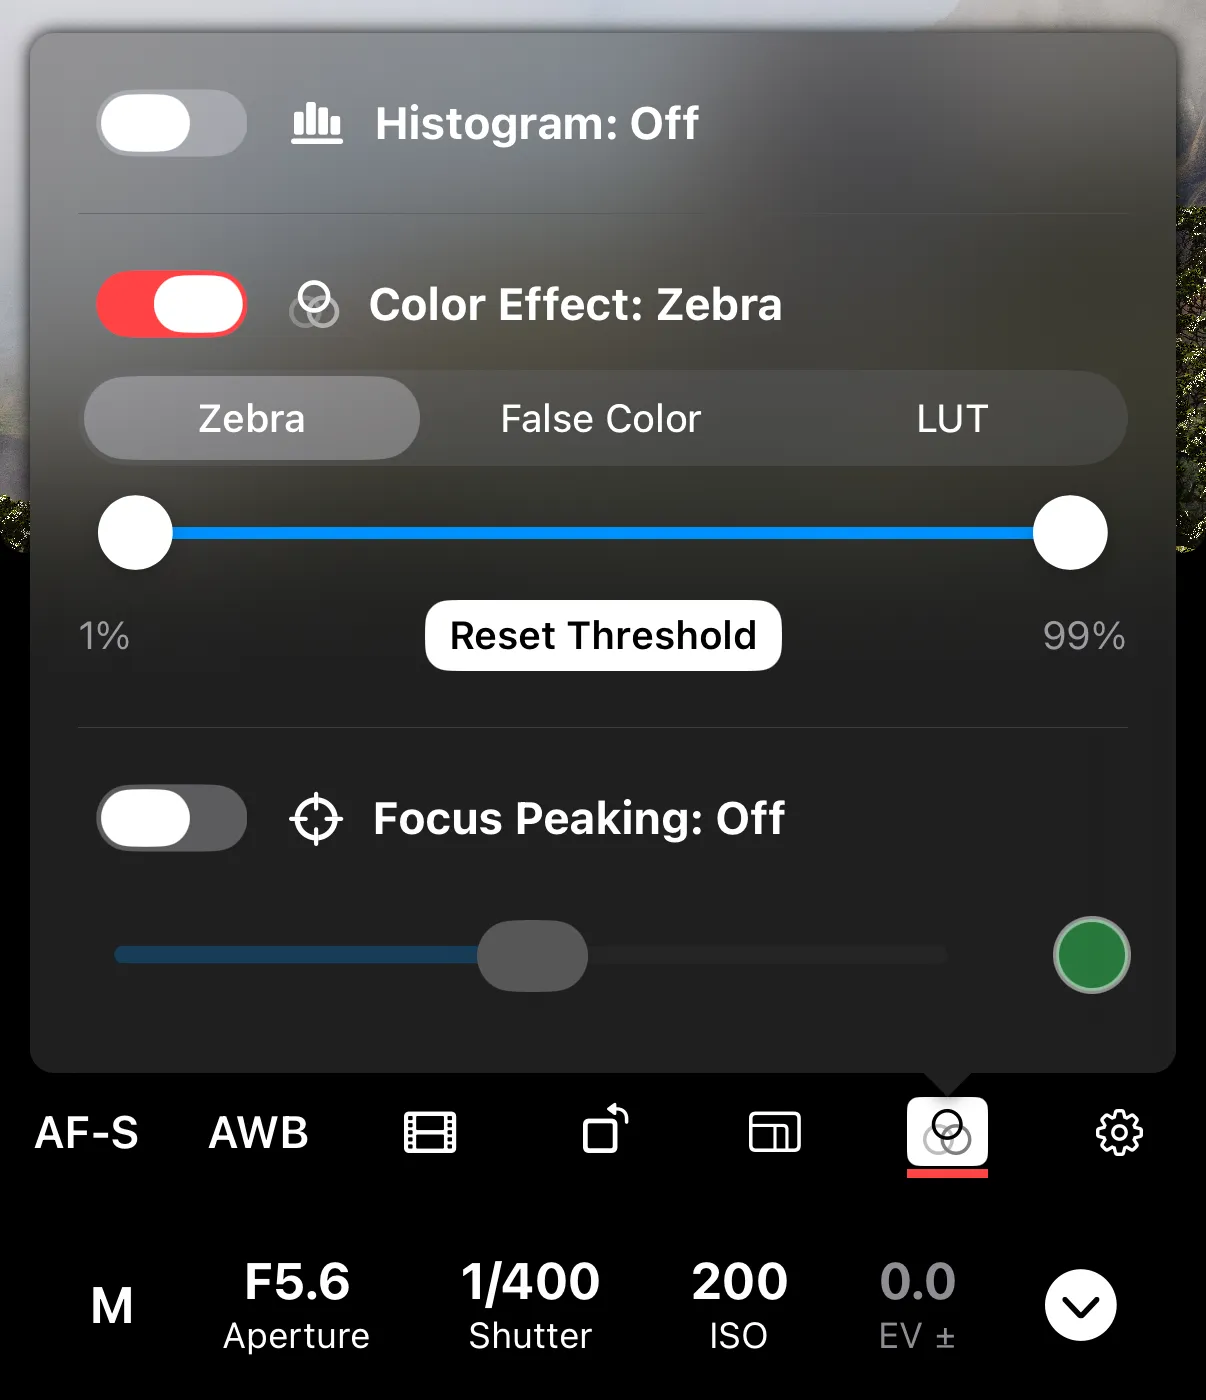
Choose your Color Effect. You’ll be able to select Zebra, False Color, or LUT. Only one of these three can be active at a time — turning one on switches the others off. (The histogram is separate and can stay on screen alongside whichever one you pick.)
-
If you chose Zebra, set your thresholds. You can set a minimum and maximum brightness percentage — anything outside that range gets striped. The default range is 1%–99%. Lower the max threshold to catch highlights earlier, raise the min threshold to catch shadows earlier, or tap Reset Threshold to go back to the default.
-
If you chose False Color, use the brightness key next to the live view to read what each color means, and adjust your exposure until midtones and skin tones sit near the middle of the scale.
That’s the whole setup. Both tools update in real time as you adjust shutter speed, aperture, ISO, or exposure compensation from the same screen, so you can dial in exposure and watch the overlay respond immediately.
How to Actually Use Zebra Stripes Once They’re On
Reading zebra stripes is straightforward, but getting the thresholds right takes a little judgment:
-
For highlights, a common approach is setting the max threshold somewhere around 95–99%, so you get a warning just before you actually clip detail — giving yourself a small buffer rather than finding out only once it’s too late.
-
For shadows, raising the min threshold flags areas that are about to lose detail into pure black, which matters more in scenes with deep shade or heavy backlighting.
-
What “correct” looks like changes with the shot. A scene with a bright sky and dark foreground calls for different thresholds than a flat, evenly lit product shot. There’s no single number that’s right for every situation — it depends on the light levels in the scene, how much dynamic range your sensor can hold, and how much you’re willing to sacrifice in post-processing.
-
Pair zebra stripes with the histogram rather than using it alone. Zebra stripes tell you where in the frame a problem is; the histogram tells you the overall shape of your exposure. Together they cover more ground than either alone.
How to Actually Use False Color Once It’s On
-
Aim to keep midtones and skin tones near the center of the scale. That’s where Shutter+‘s false color reads correct exposure for the average subject.
-
Watch for warm colors creeping in — yellows and reds signal you’re heading toward overexposed areas, the same way zebra stripes would flag them, just spread across the whole frame instead of isolated patches.
-
Use it especially when shooting flat or log video profiles, since the live view in those profiles often looks deliberately washed out and is hard to judge by eye. False color gives you a consistent reference regardless of how flat the picture profile looks.
-
Re-check after any exposure change. Because false color recolors the whole frame, small adjustments to shutter speed or ISO are immediately visible as shifting colors — which makes it a fast way to fine-tune exposure by feel once you’re used to reading it.
Where These Tools Actually Help
-
Landscape photography — spot a blown-out sky or lost shadow detail before you’ve locked in your composition, instead of finding out back at your computer.
-
Real estate photography — bright windows against darker interiors are a classic clipping trap; zebra stripes make it obvious when a window has gone past recoverable.
-
Portraits and self-portraits — false color’s midtone reference is a fast way to judge whether skin tones are properly exposed, especially useful if you’re shooting solo and can’t have someone else check the screen for you.
-
Video and vlogging — false color paired with a flat or log profile keeps exposure consistent shot to shot, which matters more in video than stills since inconsistent exposure between clips is much more noticeable once edited together.
-
Long exposure and astrophotography — zebra stripes help you judge whether a bright light source (like the moon, or foreground lighting) is clipping during a long exposure, before you commit several minutes to a shot you’ll need to redo.
Common Mistakes to Avoid
-
Trying to run zebra and false color at the same time. Only one color effect can be active at once in Shutter+ — pick whichever answers the question you actually have for that shot.
-
Setting zebra thresholds and forgetting about them. A 95% threshold that’s perfect for a sunny landscape will constantly flag skin tones in a portrait. Reset or adjust thresholds when you switch subjects.
-
Assuming the overlay is baked into the photo or video. Both tools are preview-only; they don’t alter your captured file in any way, so don’t worry about them showing up in your final images.
-
Not checking camera compatibility first. Not every camera model connects to every remote app the same way — confirm yours is on the supported cameras list before you build a shoot around it.
False Color and Zebra Stripes vs. the Histogram
These tools aren’t a replacement for the histogram — they answer a different question. The histogram shows you the overall distribution of tones across the frame as a graph, which is great for judging overall exposure balance at a glance, but it doesn’t tell you where in the frame a problem is. Zebra stripes and false color show you exactly where. Using the histogram together with zebra stripes or false color gives you both the big picture and the specific trouble spots, which is why Shutter+ keeps the histogram available alongside either overlay rather than forcing you to choose.
FAQ
What’s the actual difference between false color and zebra stripes?
Zebra stripes overlay a striped pattern only on areas that cross a brightness threshold you set, leaving the rest of the image in normal color. False color recolors the entire frame based on brightness, giving you a full exposure map rather than flagging isolated trouble spots.
Can I use zebra stripes and false color at the same time?
No — in Shutter+, only one color effect (Zebra, False Color, or LUT) can be active at once. The histogram is separate and can stay visible alongside whichever one you choose.
Do zebra stripes or false color affect my final photo or video?
No. Both are live-view monitoring tools only. They change what you see on screen while shooting, not the file your camera actually records.
How do I know if my camera has zebra stripes or false color built in?
Check your camera’s own menu system, usually under video or display settings. Many entry-level DSLRs, older mirrorless cameras, and stills-focused compacts never included either feature, since both originated as video-monitoring tools.
Can Shutter+ add these tools to a camera that doesn’t have them natively?
Yes. Shutter+ generates zebra stripes and false color itself from the live view feed your camera streams to the app, so it works even if the camera’s own firmware has no such option. Confirm your specific model on the supported cameras page first.
What do the colors mean in Shutter+‘s false color mode?
The scale runs from 0–100 IRE. Cool colors (blues and greens) mean darker areas, warm colors (yellows and reds) mean brighter areas, and properly exposed midtones and skin tones sit near the middle of the scale.
What zebra threshold should I use?
It depends on the scene. A common starting point is a max threshold around 95–99% to catch highlights just before they clip, but the right setting shifts with the light levels, your sensor’s dynamic range, and how much detail you’re willing to lose. There’s no single correct number for every shot.
Is Shutter+ available on Android?
No. Shutter+ is built for iPhone, iPad, and Apple Watch only, with no current plans for an Android version.
Related Guides
-
Understanding the Shutter+ Histogram — the tool to pair with zebra stripes or false color for a full picture of your exposure.
-
LUT Preview: Grading Your Shot Before You Record — useful if you shoot flat or log video profiles and want to preview the graded look in real time.
-
Focus Peaking — the equivalent live-view tool for nailing focus instead of exposure.
-
Supported Cameras — check compatibility and see exactly which features work with your camera model.